
본 포스팅에서 다뤄볼 것
<FCM>
1. Firebase FCM
2. FCM 서비스 계정 키 얻기
3. FCM 서비스 키 얻기
</FCM>
<Expo>
4. Expo, FCM push token 얻기
5. push 알림 채널 및 설정
6. 포그라운드 알림 설정
7. 포그라운드 알림 처리
8. 알림 클릭 처리 및 데이터 담아 보내기
</Expo>
<Expo EAS>
9. 프로덕션 배포를 위한 EAS 설정
</Expo EAS>
FCM 푸시 알림 소개에 앞서 Expo 푸시 알림이 궁금하신 분들은 아래 링크의 공식문서를 확인하세요.
https://docs.expo.dev/push-notifications/push-notifications-setup/
Expo push notifications setup
Learn how to set up push notifications, get credentials for development and production, and send a testing push notification.
docs.expo.dev
⚠️ 프로덕션 빌드 후 스토어에 배포를 하게 되면 Expo 알림 대신 FCM 푸시 알림을 사용해야 하므로 개발 환경에서부터 FCM을 사용하는 것을 추천합니다.
1. Firebase FCM
FCM 푸시 알림을 사용하려면 우선, firebase의 FCM에 프로젝트 생성 후 키를 발급 받아야합니다.
https://docs.expo.dev/push-notifications/sending-notifications-custom/
Send notifications with FCM and APNs
Learn how to send notifications with FCM and APNs.
docs.expo.dev
1-1. 회원가입 및 로그인
https://console.firebase.google.com/
로그인 - Google 계정
이메일 또는 휴대전화
accounts.google.com
1-2. 프로젝트 생성
새로운 프로젝트를 생성하거나 기존 프로젝트를 선택합니다.

2. FCM 서비스 계정 키 얻기
2-1. 프로젝트 생성 후 프로젝트 설정에서 서비스 계정을 선택합니다.

2-2. 서비스 계정 키 발급
서비스 계정 키를 발급받은 후 저장합니다.
파일명이 "name-xxxxx-firebase-adminsdk-xxxxx... .json" 형식으로 되어있을 것입니다.

발급받은 서비스 키를 frontend 폴더에 저장합니다.
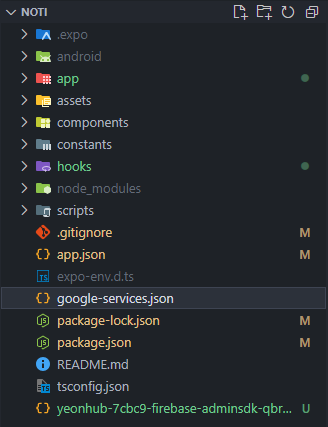
만약 공개 리포지토리에서 관리를 한다면 .gitignore에 추가해 주시기 바랍니다.
3. FCM 서비스 키 얻기
프로젝트 페이지에서 iOS / Android를 선택해 새로운 앱을 추가해 줍니다.

패키지 네임은 app.json에 있습니다.
app.json > expo > android > package
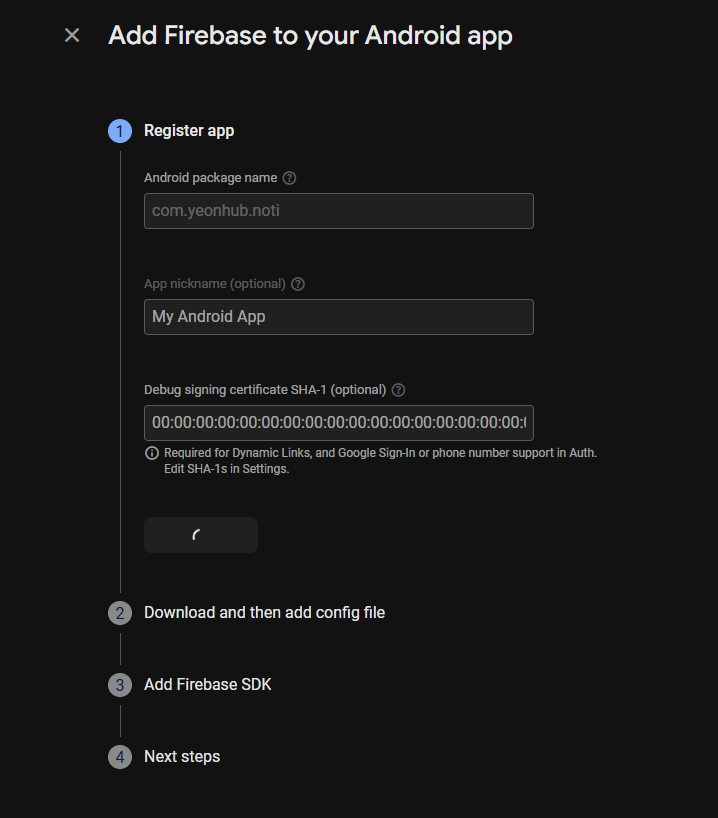
서비스 키를 발급받은 후 "google-services.json"을 저장합니다.


발급 받은 서비스 키를 frontend 폴더에 저장합니다.
마찬가지로 공개 리포지토리에서 관리를 한다면 .gitignore에 google-services.json을 추가해 주시기 바랍니다.
4. Expo, FCM push token 얻기
FCM의 push token을 얻기 위해 조금 전 발급받은 서비스 키를 등록해야 합니다.
https://docs.expo.dev/push-notifications/fcm-credentials/
Obtain Google Service Account Keys using FCM V1
Learn how to create or use a Google Service Account Key for sending Android Notifications using FCM.
docs.expo.dev
app.json 파일에 google-services.json을 추가해 줍니다.
아래 공식문서 예시 코드엔 "./path/to/google-services.json"로 경로가 잡혀있는데 실제 본인의 경로를 추가해 주면 됩니다.
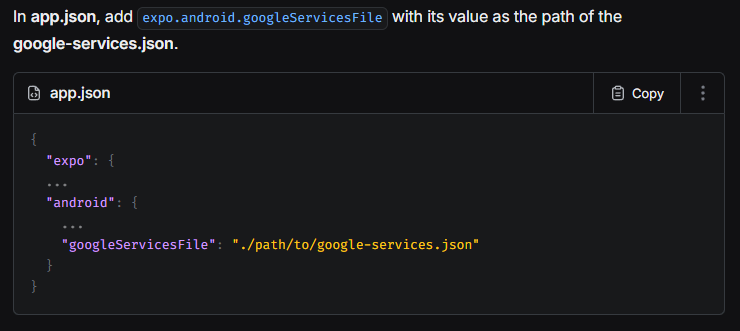
본 포스팅 예제에선 루트(최상단)에 위치하므로 아래와 같이 추가해 주었습니다.
{
"expo": {
...
"android": {
...
"googleServicesFile": "./google-services.json"
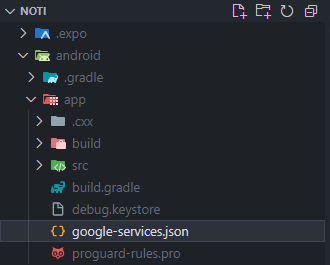
},app.json을 수정하였다면, 네이티브 코드 적용을 위해 프리빌드를 진행합니다.
npx expo prebuild프리빌드 후 생성된 android 폴더에서 app 폴더에 google-services.json를 확인할 수 있다면, 성공적으로 추가된 것입니다.
https://docs.expo.dev/push-notifications/push-notifications-setup/
Expo push notifications setup
Learn how to set up push notifications, get credentials for development and production, and send a testing push notification.
docs.expo.dev

push token을 얻기 위한 라이브러리를 설치해 줍니다.
npx expo install expo-notifications expo-device expo-constants
(필수) expo-notifications : expo에서 푸시 알림 기능 사용 시 필요한 라이브러리
(선택) expo-device : 실물 디바이스인지 확인하는 라이브러리
(선택) expo-constants : Expo token 가져올 때 projectId를 자동으로 가져오기 위한 라이브러리
네이티브를 건드리는 작업을 한 후 prebuild를 하게 되면 해당 기능을 비활성화하지 않는 이상 Expo go를 사용할 수 없습니다.
푸시 알림을 확인하기 위해선 실물 디바이스가 필요하니(에뮬레이터 X) 유/무선으로 디바이스를 연결 후 아래 명령어로 앱을 설치해 주시기 바랍니다.
npx expo run
import React, { useState } from "react";
import { StyleSheet, Switch, Text, View } from "react-native";
import * as Notifications from "expo-notifications";
import Constants from "expo-constants";
export default function HomeScreen() {
// toggle 상태값
const [isEnabled, setIsEnabled] = useState<boolean>(false);
// Expo 푸시 토큰
const [expoToken, setExpoToken] = useState<string>("");
// FCM 푸시 토큰
const [fcmToken, setFcmToken] = useState<string>("");
// 푸시 알림 권한 요청
const registerForPushNotifications = async (): Promise<void> => {
try {
// 알림 권한 확인
const { status: existingStatus } =
// 알림 권한 요청
await Notifications.getPermissionsAsync();
// 알림 권한 상태 업데이트
let finalStatus = existingStatus;
// 알림 권한이 거부되었을 경우
if (existingStatus !== "granted") {
// 알림 권한 재요청
const { status } = await Notifications.requestPermissionsAsync();
// 알림 권한 상태 업데이트
finalStatus = status;
}
// 재요청 시에도 알림 권한이 거부되었을 경우
if (finalStatus !== "granted") {
alert("알림 권한이 거부되었습니다!");
setIsEnabled(false);
return;
}
// Expo 푸시 토큰 가져오기
// ************ Error getting push token 에러 발생 시 ************
// * *
// * 1. app.json > expo > extra > eas > projectId *
// * 2. projectId 변수에 직접 할당 *
// * 3. const projectId = "xxxxxx-xxxx-xxxx-xxxx-xxxxxxxxxxxx" *
// * *
// **************************************************************
const projectId =
Constants?.expoConfig?.extra?.eas?.projectId ??
Constants?.easConfig?.projectId;
// const projectId = "xxxxxx-xxxx-xxxx-xxxx-xxxxxxxxxxxx"
const expoTokenData = await Notifications.getExpoPushTokenAsync({
projectId,
});
setExpoToken(expoTokenData.data);
console.log(`expo : ${expoTokenData.data}`);
// FCM 토큰 가져오기
const fcmTokenData = await Notifications.getDevicePushTokenAsync();
setFcmToken(fcmTokenData.data);
console.log(`fcm : ${fcmTokenData.data}`);
setIsEnabled(true);
} catch (error) {
console.log("Error getting push token:", error);
alert("푸시 토큰을 가져오는데 실패했습니다");
setIsEnabled(false);
}
};
const toggleSwitch = async (value: boolean): Promise<void> => {
if (value) {
await registerForPushNotifications();
} else {
setExpoToken("");
setFcmToken("");
setIsEnabled(false);
}
};
return (
<View style={styles.container}>
<Switch
trackColor={{ false: "#AAAAAA", true: "#050259" }}
thumbColor={"#FFFFFF"}
ios_backgroundColor="#AAAAAA"
onValueChange={toggleSwitch}
value={isEnabled}
/>
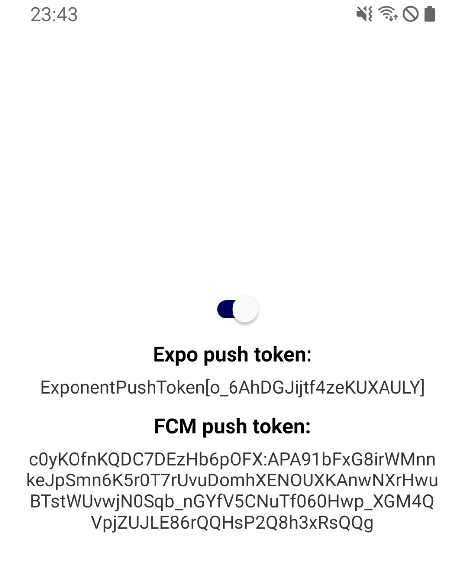
<Text style={styles.label}>Expo push token:</Text>
<Text style={styles.token}>{expoToken || "N/A"}</Text>
<Text style={styles.label}>FCM push token:</Text>
<Text style={styles.token}>{fcmToken || "N/A"}</Text>
</View>
);
}Error getting push token: [Error: No "projectId" found. If "projectId" can't be inferred from the manifest (for instance, in bare workflow), you have to pass it in yourself.]
에러 발생 시 EAS 빌드 또는 Expo config에서 projectId를 찾지 못하는 것이므로 수동으로 넣어주면 됩니다.
1. app.json > expo > extra > eas > projectId 가 있을 경우
1-1. const projectId = "xxxxxx-xxxx-xxxx-xxxx-xxxxxxxxxxxx" 변수에 직접 할당
2. app.json > expo > extra > eas > projectId 가 없을 경우
2-1. https://expo.dev/signup 회원가입
2-2. eas cli 설치 $ npm install -g eas-cli
2-3. 프로젝트 루트 경로에서 $ eas login
2-4. expo.dev와 같은 계정으로 로그인합니다.
2-5. $ eas init
2-6. app.json > expo > extra > eas > projectId 확인
2-7. 확인이 불가능할 시 https://expo.dev/ 접속
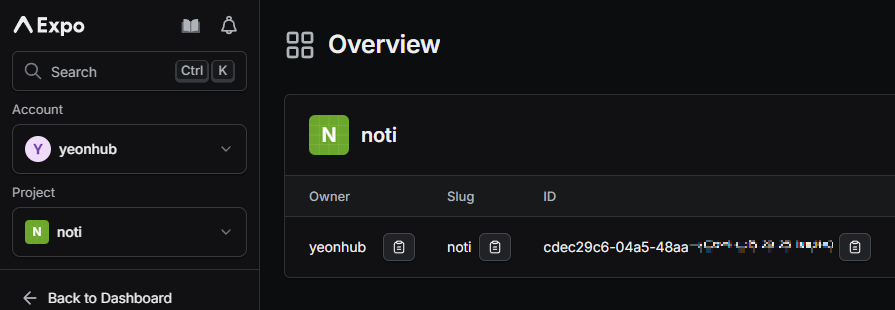
2-8. 프로젝트 선택 후 Overview에 있는 ID를 사용하면 됩니다.
해결이 되지 않거나 어렵다면 Expo token을 가져오는 기능을 주석처리 하거나, 9-0. 선행작업을 따라 하시기 바랍니다.
위 예제를 확인하면 toggle switch의 value가 true로 변할 때마다 token을 가져오게 됩니다.
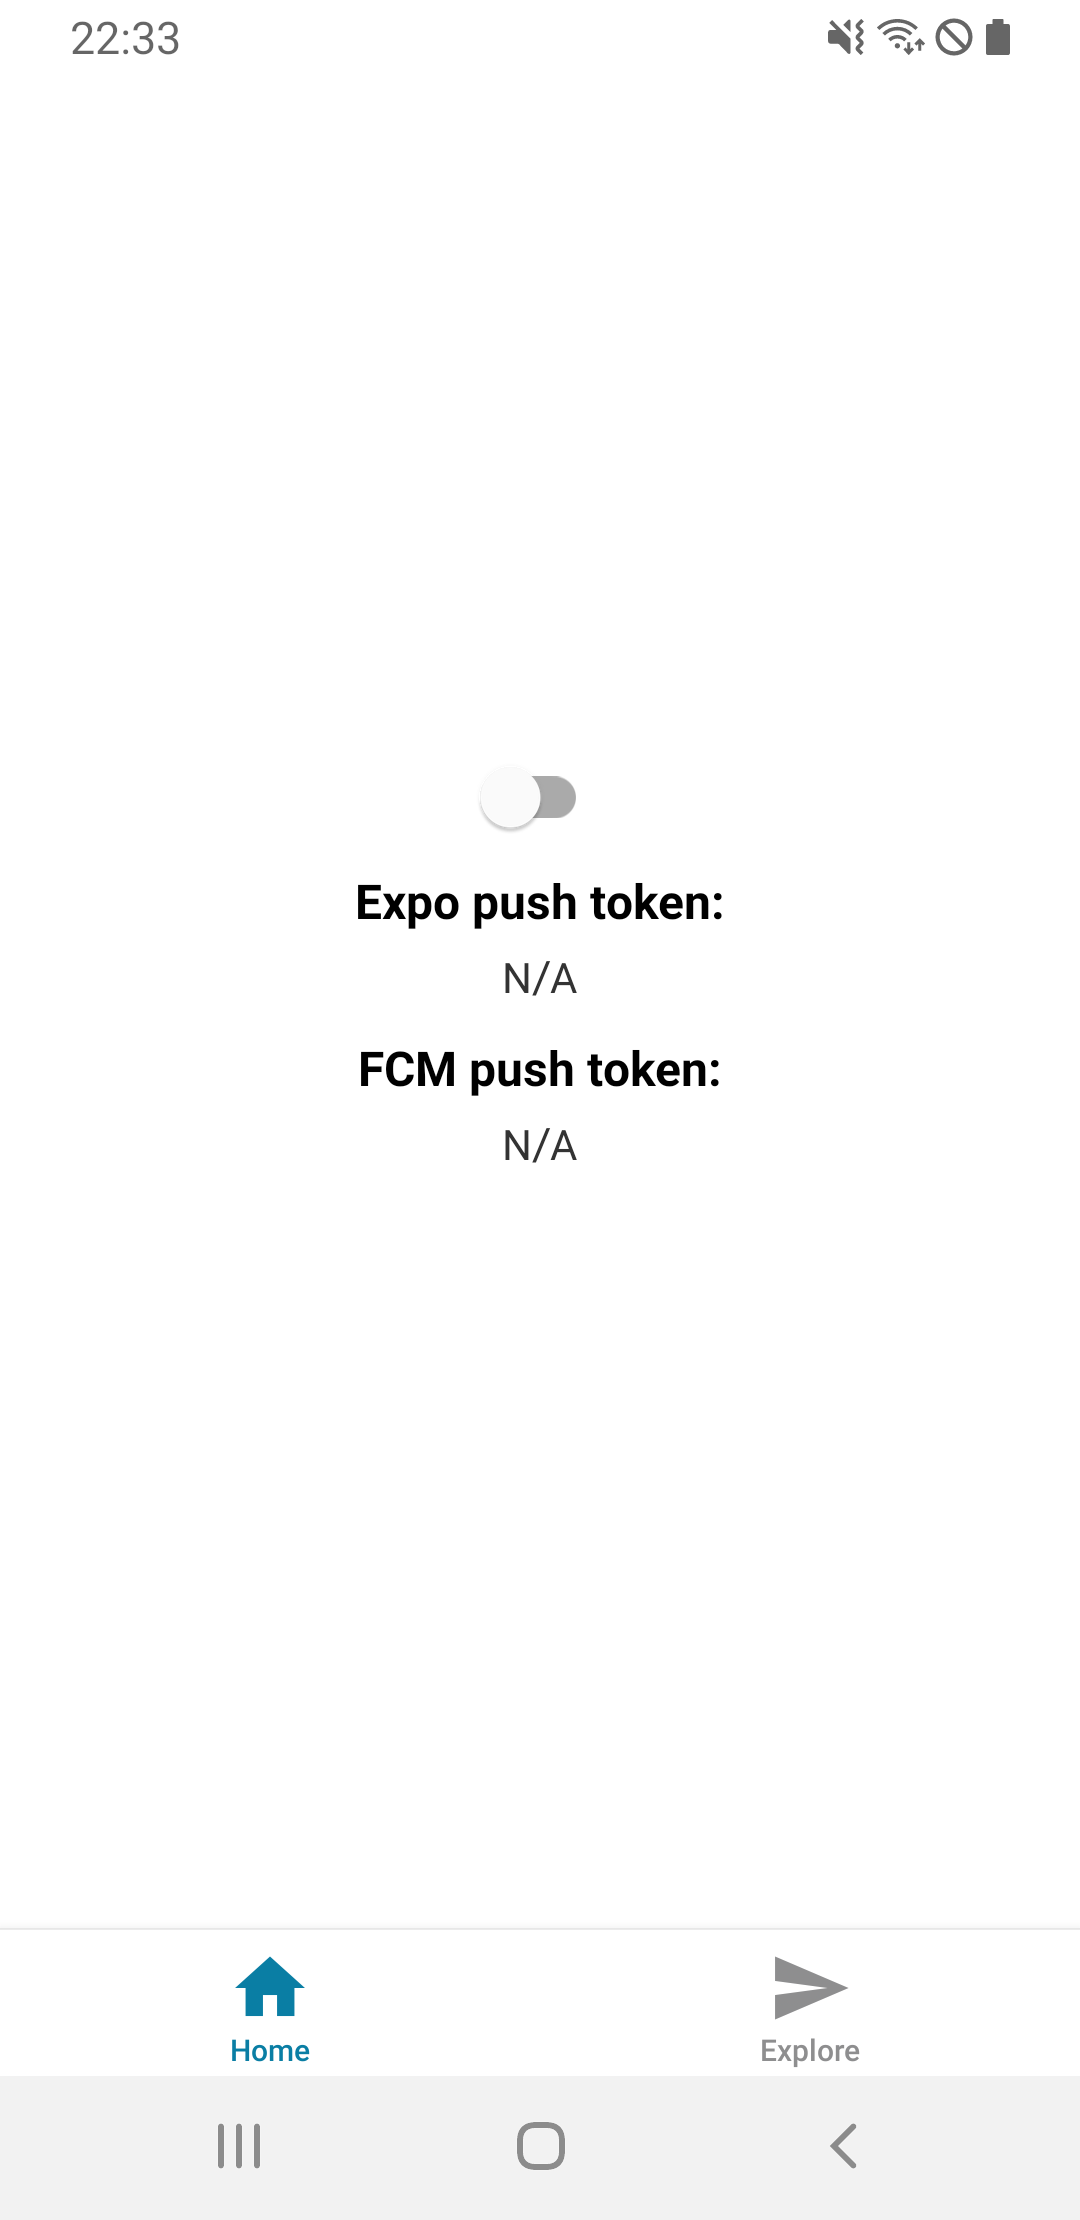
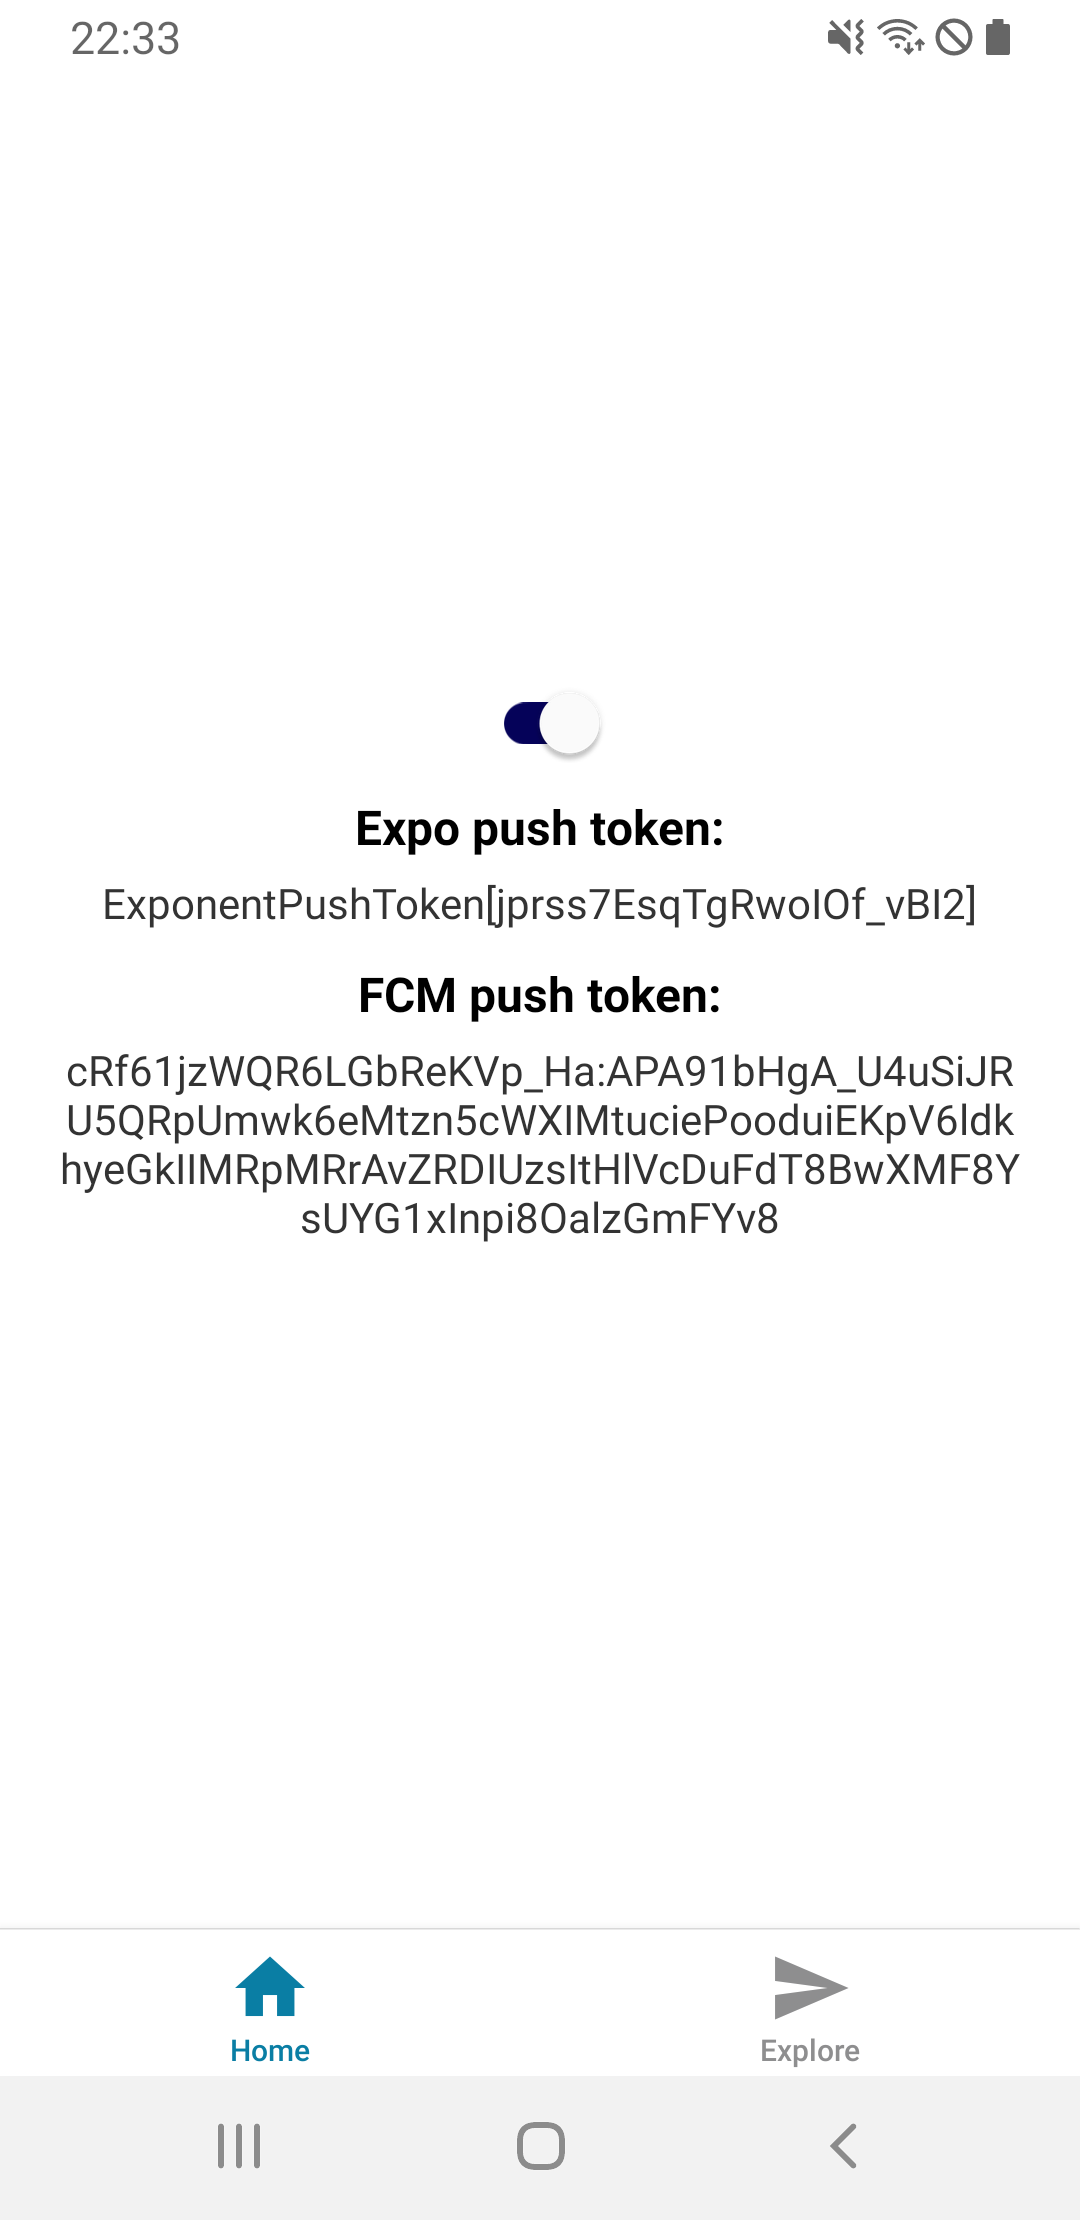
token을 성공적으로 가져왔다면 테스트를 통해 실제 알림을 받을 수 있는지 확인할 수 있습니다.
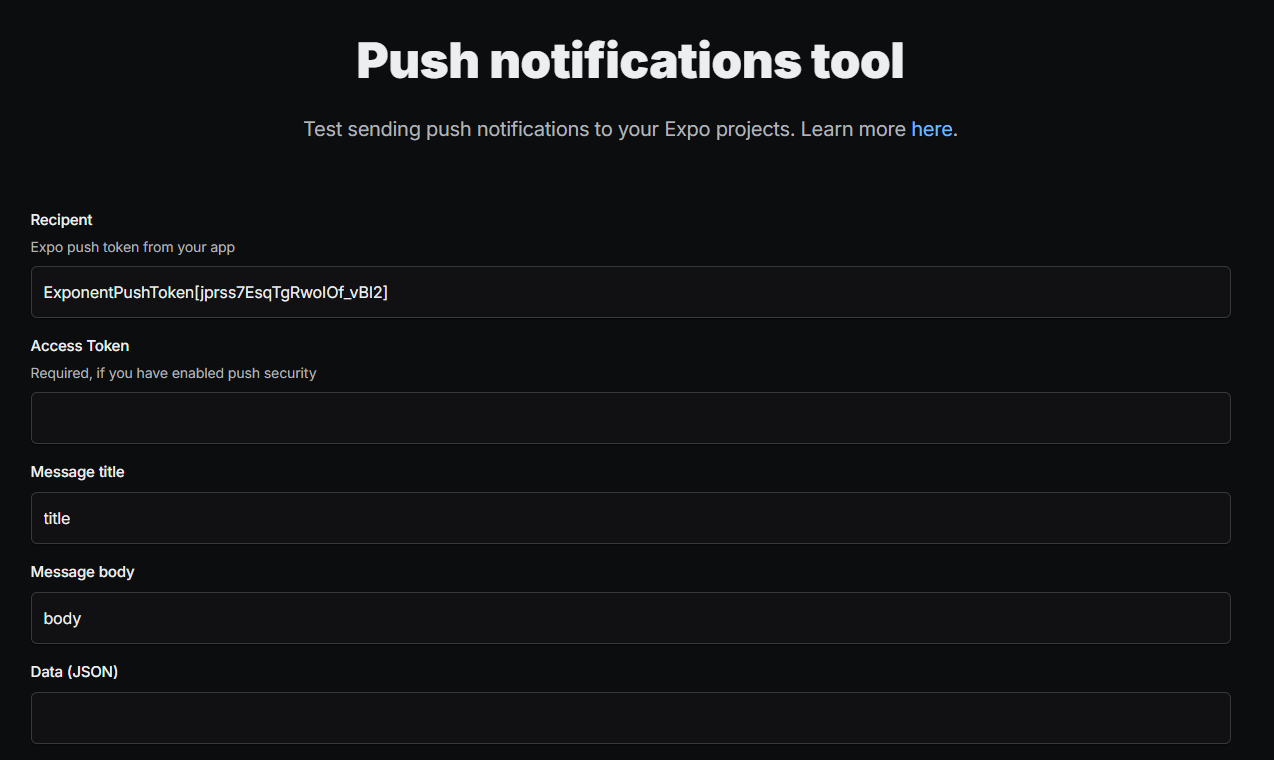
Expo token 테스트
https://expo.dev/notifications
Push Notification Tool — Expo
Test sending push notifications to your device.
expo.dev
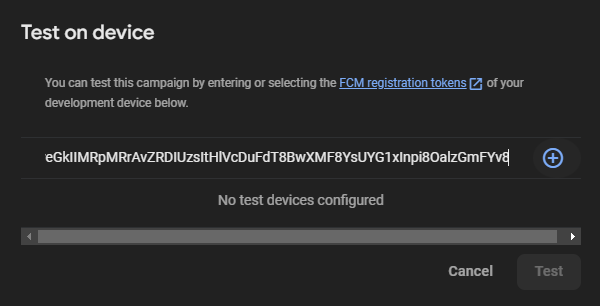
FCM token 테스트
https://console.firebase.google.com/
로그인 - Google 계정
이메일 또는 휴대전화
accounts.google.com
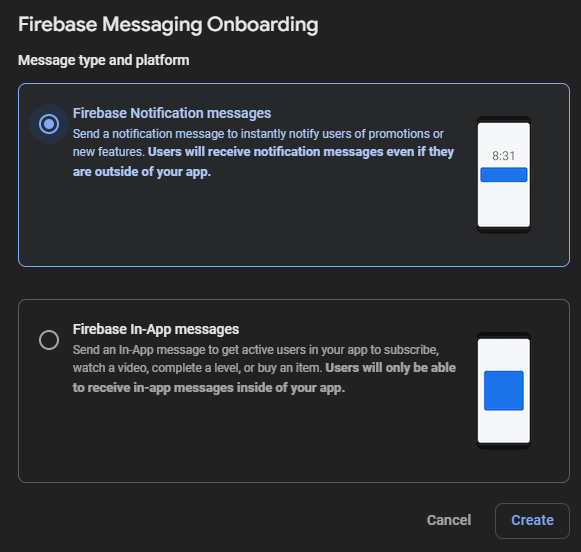
Messaging - Create your first campaign - Firebase Notification messages
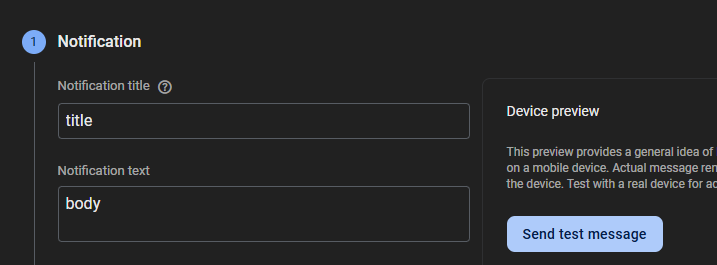
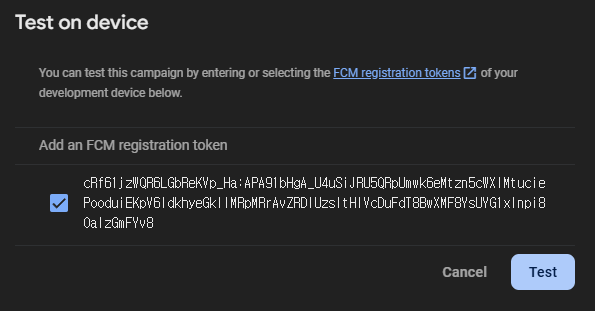
title에 알림 제목, text에 알림 내용을 작성한 후 + 버튼을 눌러 FCM 토큰을 추가해 줍니다.
앱이 활성화되어있다면 알림이 오지 않는 것이 정상입니다.
앱을 종료하거나 터미널에서 ADB Metro 서버를 종료하지 말고 홈 버튼을 눌러 앱을 백그라운드에 두고 시도하면 알림이 정상적으로 올 것입니다.
해당 내용은 6. 포그라운드 알림 설정에서 다루겠습니다.
5. push 알림 채널 및 설정
안드로이드의 경우 push 알림을 받을 때 특정 채널, 진동, 중요도 등을 설정할 수 있습니다.
Notifications
A library that provides an API to fetch push notification tokens and to present, schedule, receive and respond to notifications.
docs.expo.dev
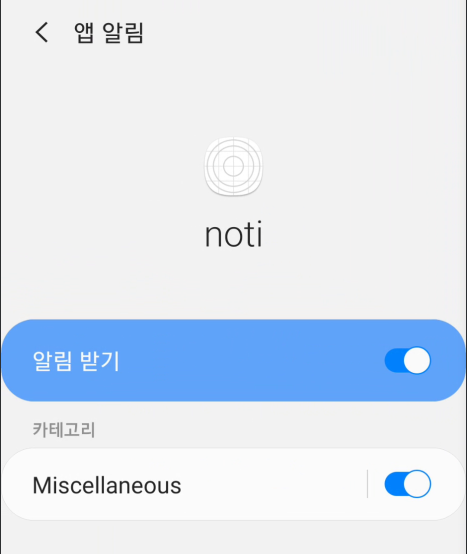
알림의 이름을 설정해 주지 않으면 Miscellaneous로 표시됩니다.
  // 알림 채널 설정 함수
  const setupNotificationChannel = async () => {
    if (Platform.OS === "android") {
      // 알림 채널 설정
      await Notifications.setNotificationChannelAsync("announce", {
        // 앱 알림 환경설정 채널 표시 이름
        name: "공지사항",
        // 중요도
        importance: Notifications.AndroidImportance.HIGH,
        // 알림 소리
        sound: "default",
        // 진동 패턴
        vibrationPattern: [0, 250, 250, 250],
        // 진동 활성화
        enableVibrate: true,
      });
      console.log("Notification channel set up");
    }
  };
안드로이드에서 알림 채널을 설정하는 함수를 추가해 줍니다.
announce : 채널명
"공지사항" : 앱 설정에서 보이는 알림 카테고리
해당 함수를 호출하도록 추가합니다.
  const toggleSwitch = async (value: boolean): Promise<void> => {
    if (value) {
      // 채널 설정 함수 호출
      await setupNotificationChannel();
      await registerForPushNotifications();
    } else {
      setExpoToken("");
      setFcmToken("");
      setIsEnabled(false);
    }
  };
채널을 수정한 후에 적용된 것을 확인하고 싶다면, 앱을 디바이스에서 삭제 후 npx expo run을 다시 해주면 가능합니다.

6. 포그라운드 알림 설정
앱이 활성화되었을 때(포그라운드) 알림을 받고싶다면 포그라운드 설정을 해주어야 합니다.
https://docs.expo.dev/push-notifications/receiving-notifications/#foreground-notification-behavior
Handle incoming notifications
Learn how to respond to a notification received by your app and take action based on the event.
docs.expo.dev
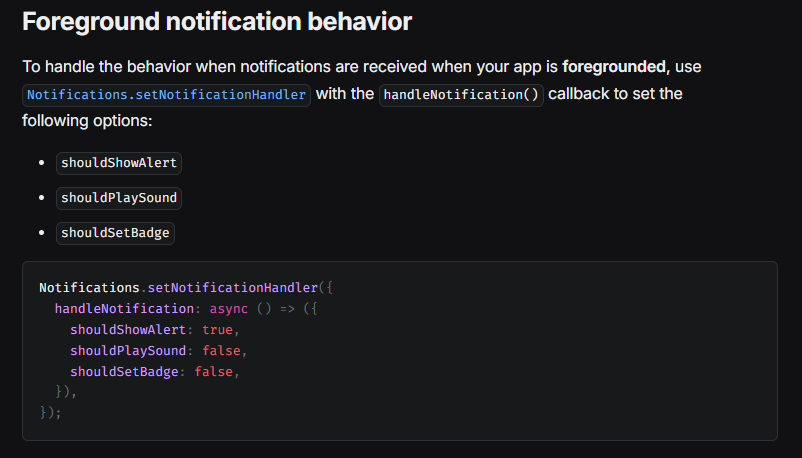
  // 포그라운드에서 알림 동작 설정
  Notifications.setNotificationHandler({
    handleNotification: async () => ({
      shouldShowAlert: true, // 알림 표시
      shouldPlaySound: false, // 소리 재생 여부
      shouldSetBadge: false, // 배지 갯수 변경 여부
    }),
  });
7. 포그라운드 알림 처리
https://docs.expo.dev/versions/latest/sdk/notifications/#addnotificationreceivedlistenerlistener
Notifications
A library that provides an API to fetch push notification tokens and to present, schedule, receive and respond to notifications.
docs.expo.dev
포그라운드 상태에서 알림을 받았을 때 모달창을 표시하거나 알림 내용을 화면에 랜더링 하는 등 특정 동작을 하도록 기능을 추가할 수 있습니다.
본 예제에선 알림의 body를 화면에 랜더링 하도록 하겠습니다.
import React, { useState, useEffect, useRef } from "react";
import { Platform, StyleSheet, Switch, Text, View } from "react-native";
import * as Notifications from "expo-notifications";
import Constants from "expo-constants";
export default function HomeScreen() {
const [isEnabled, setIsEnabled] = useState<boolean>(false);
const [expoToken, setExpoToken] = useState<string>("");
const [fcmToken, setFcmToken] = useState<string>("");
const [notification, setNotification] =
useState<Notifications.Notification | null>(null);
// 알림 리스너
const notificationListener = useRef<Notifications.EventSubscription | null>(
null
);
// 알림 처리 설정
useEffect(() => {
// 알림 채널 설정
setupNotificationChannel();
// 푸시 알림 권한 설정
registerForPushNotifications();
// 포그라운드 알림 처리
notificationListener.current =
Notifications.addNotificationReceivedListener((notification) => {
setNotification(notification); // 알림 정보 업데이트
});
return () => {
// 컴포넌트가 언마운트 될 때 알림 리스너 제거
if (notificationListener.current) {
Notifications.removeNotificationSubscription(
notificationListener.current
);
}
};
}, []);
// 알림 채널 설정 함수
const setupNotificationChannel = async () => {
if (Platform.OS === "android") {
await Notifications.setNotificationChannelAsync("announce", {
name: "공지사항",
importance: Notifications.AndroidImportance.HIGH,
sound: "default",
vibrationPattern: [0, 250, 250, 250],
enableVibrate: true,
});
console.log("Notification channel set up");
}
};
// 푸시 알림 권한 요청
const registerForPushNotifications = async (): Promise<void> => {
try {
const { status: existingStatus } =
await Notifications.getPermissionsAsync();
let finalStatus = existingStatus;
if (existingStatus !== "granted") {
const { status } = await Notifications.requestPermissionsAsync();
finalStatus = status;
}
if (finalStatus !== "granted") {
alert("알림 권한이 거부되었습니다!");
setIsEnabled(false);
return;
}
// Expo 푸시 토큰 가져오기
// ************ Error getting push token 에러 발생 시 ************
// * *
// * 1. app.json > expo > extra > eas > projectId *
// * 2. projectId 변수에 직접 할당 *
// * 3. const projectId = "xxxxxx-xxxx-xxxx-xxxx-xxxxxxxxxxxx" *
// * *
// **************************************************************
const projectId =
Constants?.expoConfig?.extra?.eas?.projectId ??
Constants?.easConfig?.projectId;
// const projectId = "xxxxxx-xxxx-xxxx-xxxx-xxxxxxxxxxxx"
const expoTokenData = await Notifications.getExpoPushTokenAsync({
projectId,
});
setExpoToken(expoTokenData.data);
console.log(`expo : ${expoTokenData.data}`);
// FCM 토큰 가져오기
const fcmTokenData = await Notifications.getDevicePushTokenAsync();
setFcmToken(fcmTokenData.data);
console.log(`fcm : ${fcmTokenData.data}`);
setIsEnabled(true);
} catch (error) {
console.log("Error getting push token:", error);
alert("푸시 토큰을 가져오는데 실패했습니다");
setIsEnabled(false);
}
};
const toggleSwitch = async (value: boolean): Promise<void> => {
if (value) {
await registerForPushNotifications();
} else {
setExpoToken("");
setFcmToken("");
setIsEnabled(false);
}
};
// 포그라운드에서 알림 동작 설정
Notifications.setNotificationHandler({
handleNotification: async () => ({
shouldShowAlert: true, // 알림 표시
shouldPlaySound: false, // 소리 재생 여부
shouldSetBadge: false, // 배지 갯수 변경 여부
}),
});
return (
<View style={styles.container}>
<Switch
trackColor={{ false: "#AAAAAA", true: "#050259" }}
thumbColor={"#FFFFFF"}
ios_backgroundColor="#AAAAAA"
onValueChange={toggleSwitch}
value={isEnabled}
/>
<Text style={styles.label}>Expo push token:</Text>
<Text style={styles.token}>{expoToken || "N/A"}</Text>
<Text style={styles.label}>FCM push token:</Text>
<Text style={styles.token}>{fcmToken || "N/A"}</Text>
{notification && (
<View style={styles.notificationContainer}>
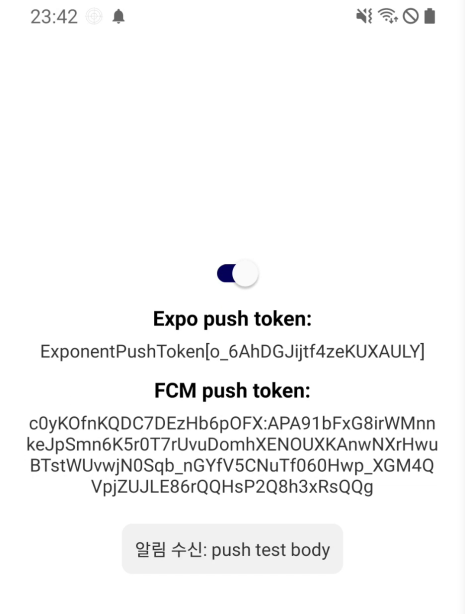
<Text style={styles.notificationText}>
알림 수신: {notification.request.content.body}
</Text>
</View>
)}
</View>
);
}
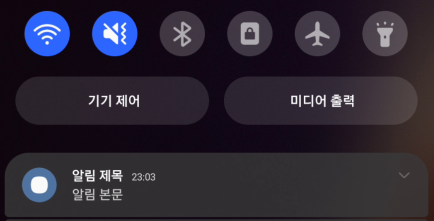
포그라운드 알림 설정을 하면 아래와 같이 앱이 활성화 되었을 때도 알림을 받을 수 있습니다.
상단에 앱 아이콘과 함께 알림이 추가되고, 랜더링 혹은 모달창을 띄우는 등 추가 기능도 가능합니다.
8. 알림 클릭 처리 및 데이터 담아 보내기
알림을 보낼 때 제목과 내용 외에 데이터를 담아서 보낼 수 있습니다.
데이터를 수신하는 코드를 추가하겠습니다.
Notifications
A library that provides an API to fetch push notification tokens and to present, schedule, receive and respond to notifications.
docs.expo.dev
export default function HomeScreen() {
  const [isEnabled, setIsEnabled] = useState<boolean>(false);
  const [expoToken, setExpoToken] = useState<string>("");
  const [fcmToken, setFcmToken] = useState<string>("");
  const [notification, setNotification] =
    useState<Notifications.Notification | null>(null);

  // 알림 리스너
  const notificationListener = useRef<Notifications.EventSubscription | null>(
    null
  );

  // 알림 응답 리스너
  const responseListener = useRef<Notifications.EventSubscription | null>(null);

  // 알림 처리 설정
  useEffect(() => {
    // 알림 채널 설정
    setupNotificationChannel();
    // 푸시 알림 권한 설정
    registerForPushNotifications();

    // 포그라운드 알림 처리
    notificationListener.current =
      Notifications.addNotificationReceivedListener((notification) => {
        setNotification(notification); // 알림 정보 업데이트
      });

    // 알림 클릭 시 동작
    responseListener.current =
      Notifications.addNotificationResponseReceivedListener((response) => {
        const data = response.notification.request.content.data;
        console.log(`customData1 : ${data.customData1}`);
        console.log(`customData2 : ${data.customData2}`);
        console.log(`customData3 : ${data.customData3}`);
      });

    return () => {
      // 컴포넌트가 언마운트 될 때 알림 리스너 제거
      if (notificationListener.current) {
        Notifications.removeNotificationSubscription(
          notificationListener.current
        );
      }
      // 컴포넌트가 언마운트 될 때 알림 응답 리스너 제거
      if (responseListener.current) {
        Notifications.removeNotificationSubscription(responseListener.current);
      }
    };
  }, []);
  .
  .
  .
알림 응답 리스너와 알림 클릭 시 동작을 추가했습니다.
이제 데이터를 담아서 알림을 보내도록 하겠습니다.
https://console.firebase.google.com/
로그인 - Google 계정
이메일 또는 휴대전화
accounts.google.com
로그인 - 프로젝트 선택 - 좌측 Messaging
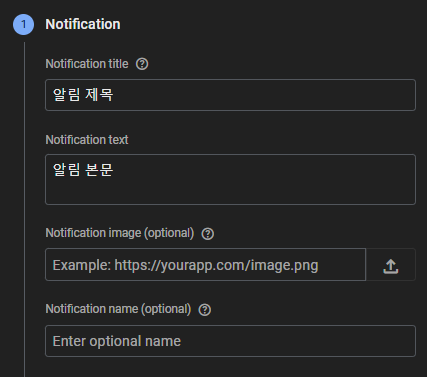
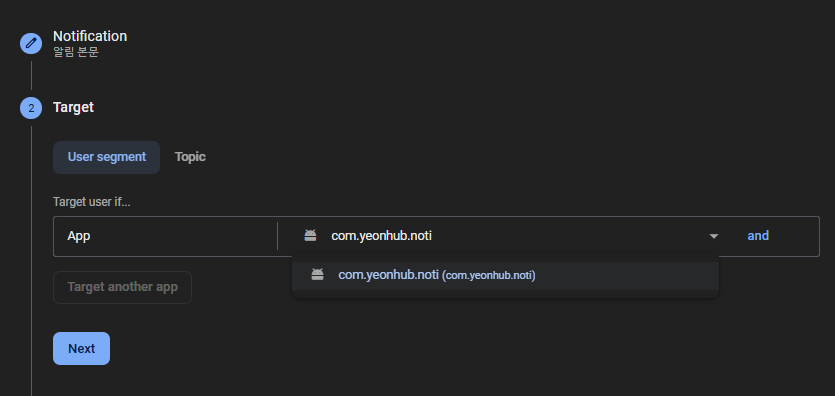
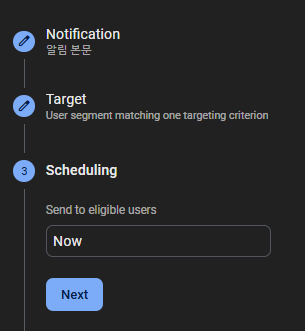
제목과 내용을 추가하고 알림 수신 타겟을 설정합니다. 위 이미지 처럼 모든 타겟을 선택하면 해당 프로젝트에 속해있는 앱의 모든 사용자가 수신할 수 있습니다.
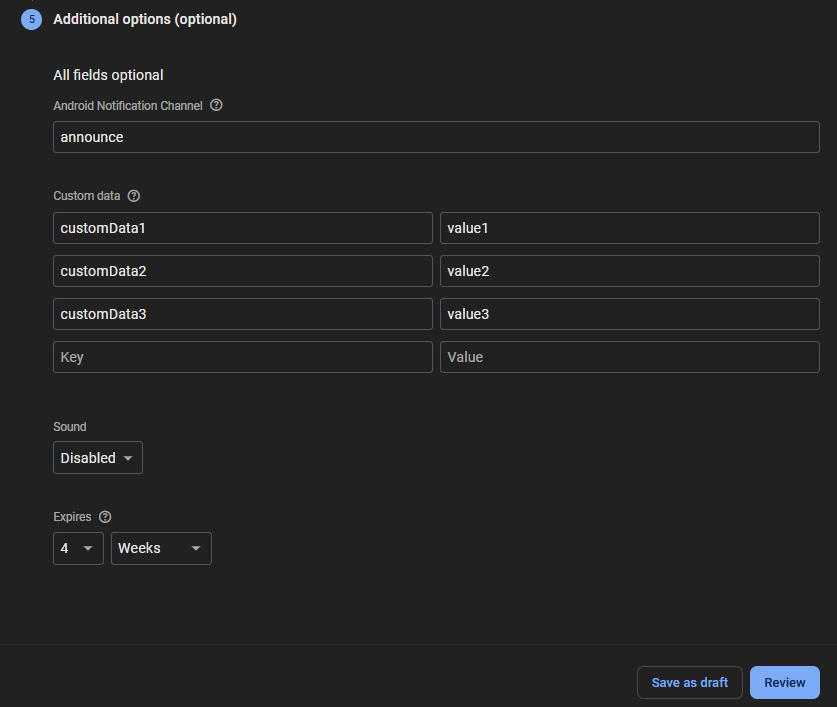
JSON 형식으로 Key와 Value를 추가하고 Review를 클릭합니다.
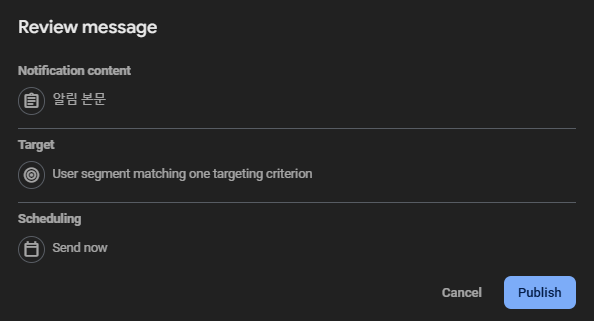
Publish를 눌러 알림을 전송하면 약 5분 이내로 알림이 도착합니다.
이제 해당 알림을 클릭하게 되면 addNotificationResponseReceivedListener 메서드를 통해 로그가 출력됩니다.
    // 알림 클릭 시 동작
    responseListener.current =
      Notifications.addNotificationResponseReceivedListener((response) => {
        const data = response.notification.request.content.data;
        console.log(`customData1 : ${data.customData1}`);
        console.log(`customData2 : ${data.customData2}`);
        console.log(`customData3 : ${data.customData3}`);
      });


LOG  customData1 : value1
LOG  customData2 : value2
LOG  customData3 : value3
9. 프로덕션 배포를 위한 EAS 설정
개발단계에선 추가 작업이 필요 없지만 프로덕션 환경에선 FCM 알림을 받기 위해 권한 및 인증을 해야 합니다.
2. FCM 서비스 계정 키 얻기에서 발급받은 json 파일을 사용합니다.
Expo FCM V1 API 인증 키를 추가하는 방법은 CLI와 expo.dev 두 가지 방법이 있습니다.
https://docs.expo.dev/push-notifications/fcm-credentials/
Obtain Google Service Account Keys using FCM V1
Learn how to create or use a Google Service Account Key for sending Android Notifications using FCM.
docs.expo.dev
9-0. 선행 작업
두 방법 모두 EAS Build를 사용하기 때문에 Expo에 프로젝트가 추가되고 EAS 초기 설정이 되어있어야 합니다.
Error getting push token 에러 해결을 위해 $ eas init을 진행했다면 9-1부터 확인하시면 됩니다.
9-0-1. expo 회원가입 및 eas cli 설치
만약 이미 계정이 존재하면 넘어가셔도 좋습니다.
Sign Up — Expo
Create an account for Expo here.
expo.dev
eas cli 설치
npm install -g eas-cli
9-0-2. eas 로그인
$ eas login
Log in to EAS with email or username (exit and run eas login --help to see other login options)
√ Email or username ... yeonhub
√ Password ... ****************
Logged in
프로젝트 루트 터미널에 eas login 명령어를 사용해 로그인해 줍니다.
9-0-3. eas init
$ eas init
? Would you like to create a project for @yeonhub/noti? » (Y/n)
로그인한 계정이 맞다면 y 혹은 엔터를 누릅니다.
$ eas init
√ Would you like to create a project for @yeonhub/noti? ... yes
✔ Created @yeonhub/noti: https://expo.dev/accounts/yeonhub/projects/noti
√ Project successfully linked (ID: 9fe217ab-xxxx-xxxx-xxxx-xxxxxxxxxx) (modified app.json)
eas.json 파일이 생성되었습니다.
9-1. eas cli FCM V1 키 추가
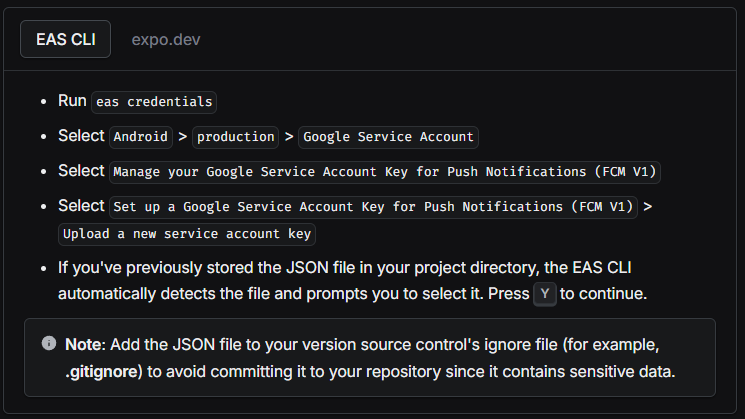
eas credentials 명령어 실행
eas credentials안드로이드 선택
$ eas credentials
? Select platform » - Use arrow-keys. Return to submit.
>   Android
    iOS
EAS 빌드 종류를 선택해야 하는데, eas.json 초기값은 development, production 두 가지이므로 원하는 것을 선택해 줍니다.
? Which build profile do you want to configure? » - Use arrow-keys. Return to submit.
    development
>   production
Google Service Account 선택
? What do you want to do? » - Use arrow-keys. Return to submit.
    Keystore: Manage everything needed to build your project
>   Google Service Account
    Push Notifications (Legacy): Manage your FCM (Legacy) API Key
    credentials.json: Upload/Download credentials between EAS servers and your local json
    Go back
    Exit
FCM V1 키 관리 선택
? What do you want to do? » - Use arrow-keys. Return to submit.
    Manage your Google Service Account Key for Play Store Submissions
>   Manage your Google Service Account Key for Push Notifications (FCM V1)
    Upload a Google Service Account Key
    Delete a Google Service Account Key
    Go back
FCM V1 키 설정 선택
? What do you want to do? » - Use arrow-keys. Return to submit.
>   Set up a Google Service Account Key for Push Notifications (FCM V1)
    Select an existing Google Service Account Key for Push Notifications (FCM V1)
    Go back
google-services.json을 업로드하려 했으나 해당 키는 클라이언트 설정 키 이므로 FCM V1 서버 인증용 키가 아닙니다.
라는 경고 메세지가 나오게 됩니다.
그리고 yeonhub-7cbc9-firebase-adminsdk-qbr9d-f0329aef64.json 파일을 찾았는데 해당 파일을 서비스 계정 키(FCM V1)로 등록하고 싶은지 물어봅니다.
파일명은 각자 다르므로 2. FCM 서비스 계정 키 얻기에서 발급받은 json이 맞다면 y 또는 엔터를 눌러줍니다.
* 해당 json은 아래와 같은 양식으로 key와 value가 저장되어 있습니다.
{
  "type": "service_account",
  "project_id": "yeonhub-xxxxx",
  "private_key_id": "xxxxxxxxxxxxxxxxxxxxxxxxxx",
  "private_key": "-----BEGIN PRIVATE KEY-----xxxxxx",
  "client_email": "xxxxxxxxxxxx",
  "client_id": "000000000000000000",
  "auth_uri": "https://accounts.google.com/o/oauth2/auth",
  "token_uri": "https://oauth2.googleapis.com/token",
  "auth_provider_x509_cert_url": "https://www.googleapis.com/oauth2/v1/certs",
  "client_x509_cert_url": "https://www.googleapis.com/xxxxx",
  "universe_domain": "googleapis.com"
}
√ What do you want to do? » Set up a Google Service Account Key for Push Notifications (FCM V1)
Oops! Looks like you uploaded a google-services.json instead of your service account key. Learn more: https://expo.fyi/creating-google-service-account
A Google Service Account JSON key has been found at
C:\Users\user\Desktop\noti\yeonhub-7cbc9-firebase-adminsdk-qbr9d-f0329aef64.json
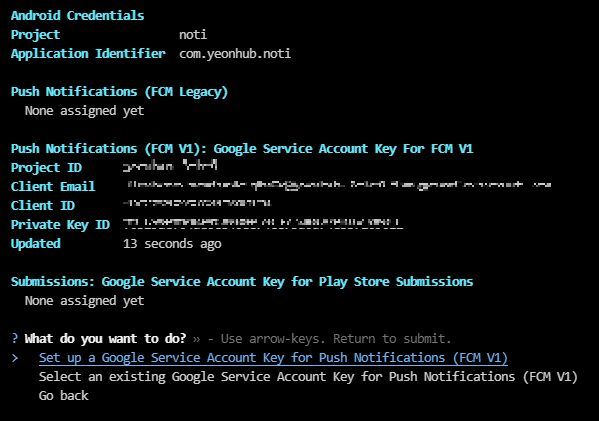
? Would you like to use this file? » (Y/n)성공적으로 추가되었습니다.
아무 키나 입력해 결과를 확인해 봅시다.
√ What do you want to do? » Set up a Google Service Account Key for Push Notifications (FCM V1)
Oops! Looks like you uploaded a google-services.json instead of your service account key. Learn more: https://expo.fyi/creating-google-service-account
A Google Service Account JSON key has been found at
  C:\Users\user\Desktop\noti\yeonhub-7cbc9-firebase-adminsdk-qbr9d-f0329aef64.json
√ Would you like to use this file? ... yes

✔ Uploaded Google Service Account Key.
✔ Google Service Account Key assigned to com.yeonhub.noti for FCM V1
Press any key to continue...
아래와 같이 FCM V1 설정 등록이 완료되었다면 성공한 것입니다.
9-2. expo.dev FCM V1 키 추가
⚠️ 9-1. eas cli 방법과 같은 작업입니다!
eas-cli가 아닌 expo.dev 웹에서 할 수 있는 내용입니다.
expo.dev credentials 페이지에 접속합니다.
https://expo.dev/accounts/%5Baccount%5D/projects/%5Bproject%5D/credentials
Log In — Expo
Log in to your Expo account.
expo.dev
프로젝트 선택
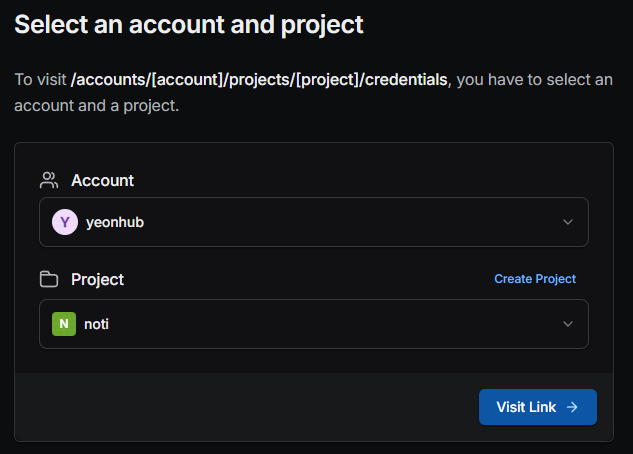
eas cli 명령어 eas init을 했기 때문에 expo 계정과 로컬의 프로젝트가 연결되어 있습니다.
해당 프로젝트를 클릭합니다.

FCM V1 service account key 탭에서 Add a service Account Key를 눌러줍니다.
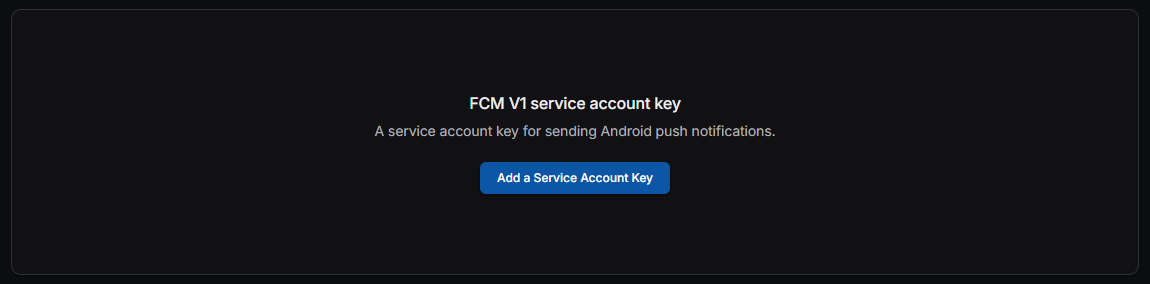
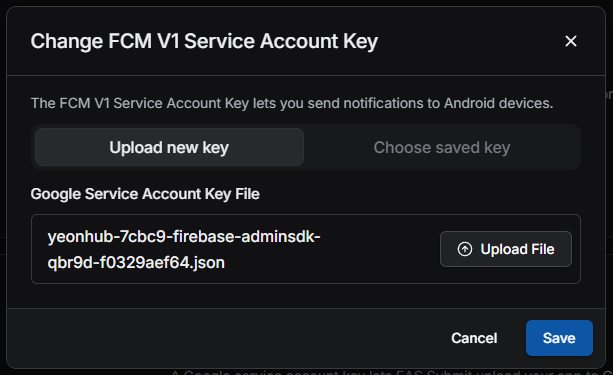
Upload File을 통해 2. FCM 서비스 계정 키 얻기에서 발급받은 json을 선택해 줍니다.
9-3. 키 등록 확인
eas-cli 또는 expo.dev 웹에서 서비스 계정 키를 추가하게 되면 아래와 같이 확인할 수 있습니다.

이 작업이 완료되었다면, 프로덕션 빌드 후 스토어에 배포를 하여도 푸시 알림을 받을 수 있습니다.
본 포스팅에선 한 가지 푸시 채널(announce)에 사운드, 진동 등을 설정하고 포그라운드 알림 시 본문 내용만 랜더링 하는 방식으로 예제를 작성하였습니다.
이를 기반으로 추가 코드를 작성하여 포그라운드에서 모달창을 띄워주거나, 특정 버튼을 활성화해 다른 스크린으로 이동하는 등 여러 방면으로 활용할 수 있습니다.
예제 코드는 github 리포지토리에 올려두었으니 전체 코드를 확인하고 싶으신 분들은 참고해 주시면 되겠습니다.
다음 포스팅에선 node.js 환경에서 FCM 푸시 알림을 전송하는 방법을 확인해 보도록 하겠습니다.
⚠️ projectId를 본인 프로젝트에 맞게 수정 후 사용해 주세요.
https://github.com/yeonhub/yeonhub-post/tree/noti
GitHub - yeonhub/yeonhub-post
Contribute to yeonhub/yeonhub-post development by creating an account on GitHub.
github.com