
본 포스팅에서 다뤄볼 것
1. expo google map 구현
2. 지도 초기 위치 (고정/현재위치)
3. 현재 위치 표시
4. 현재 위치 이동 버튼 (커스텀)
5. 지도 이동 시 동작 (예: 현재 위치 재검색)
6. 지도에 마커 표시 (커스텀)
7. 마커 선택 시 말풍선(callout) 표시 (커스텀)
8. 검색 리스트 선택 시 해당 위치로 이동+마커+말풍선
1. expo google map 구현
https://docs.expo.dev/versions/latest/sdk/map-view/
MapView
A library that provides a Map component that uses Google Maps on Android and Apple Maps or Google Maps on iOS.
docs.expo.dev
expo 공식 문서에서 확인할 수 있듯이 지도 라이브러리 react native maps를 설치해야 합니다.
포스팅에서 다루지 않는 다른 내용을 확인하고 싶으시다면 라이브러리 페이지에서 확인 가능합니다.
https://github.com/react-native-maps/react-native-maps
GitHub - react-native-maps/react-native-maps: React Native Mapview component for iOS + Android
React Native Mapview component for iOS + Android. Contribute to react-native-maps/react-native-maps development by creating an account on GitHub.
github.com
1-1. 라이브러리 설치
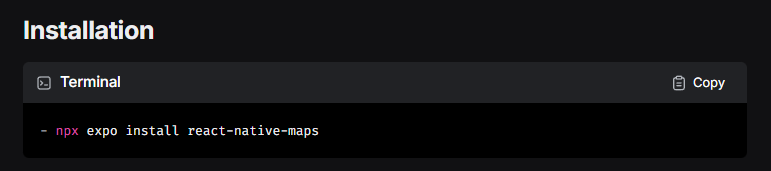
npx expo install react-native-mapsreact native maps 라이브러리는 google map과 apple map 두 가지를 사용할 수 있습니다. 선택을 하지 않으면 android는 google map iOS는 apple map이 기본 지도로 설정됩니다.
1-2. google map API key
https://console.developers.google.com/apis
Google 클라우드 플랫폼
로그인 Google 클라우드 플랫폼으로 이동
accounts.google.com
google map을 사용할 것이므로 google cloud에서 지도 사용을 위한 API key를 발급받아야 합니다.
cloud 콘솔에 접속해 기존 프로젝트를 선택하거나 새로 생성합니다.
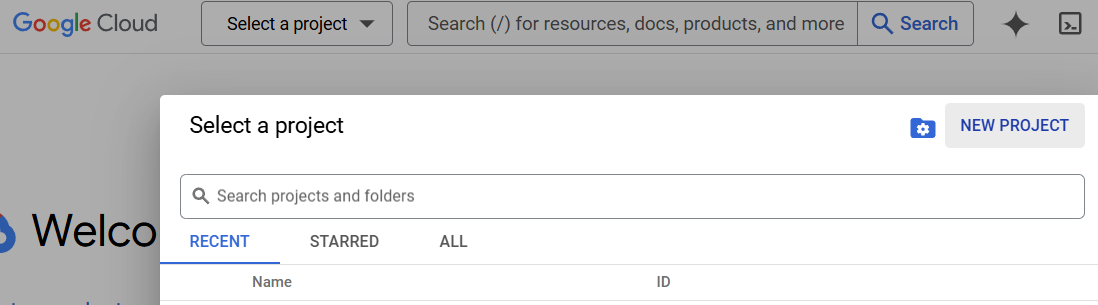
생성한 프로젝트를 선택 후 APIs - Credentials 탭으로 이동합니다.
한글명은 API 및 서비스 - 사용자 인증 정보 입니다.
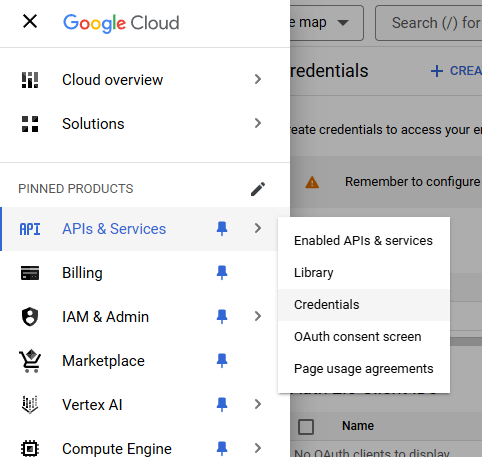
그 후 새로운 API key를 생성합니다.
한글명은 사용자 인증 정보 만들기

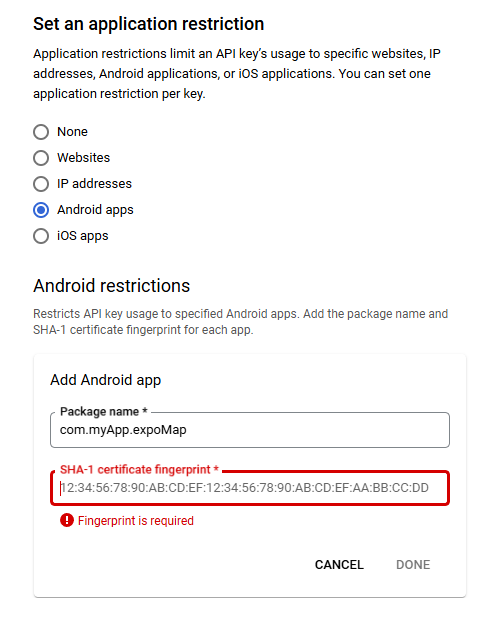
생성한 API key에 들어가 보면 우측에 key가 있고 특정 플랫폼의 앱에서만 사용할 수 있게 제한사항(Set an application restriction)을 추가할 수 있습니다.
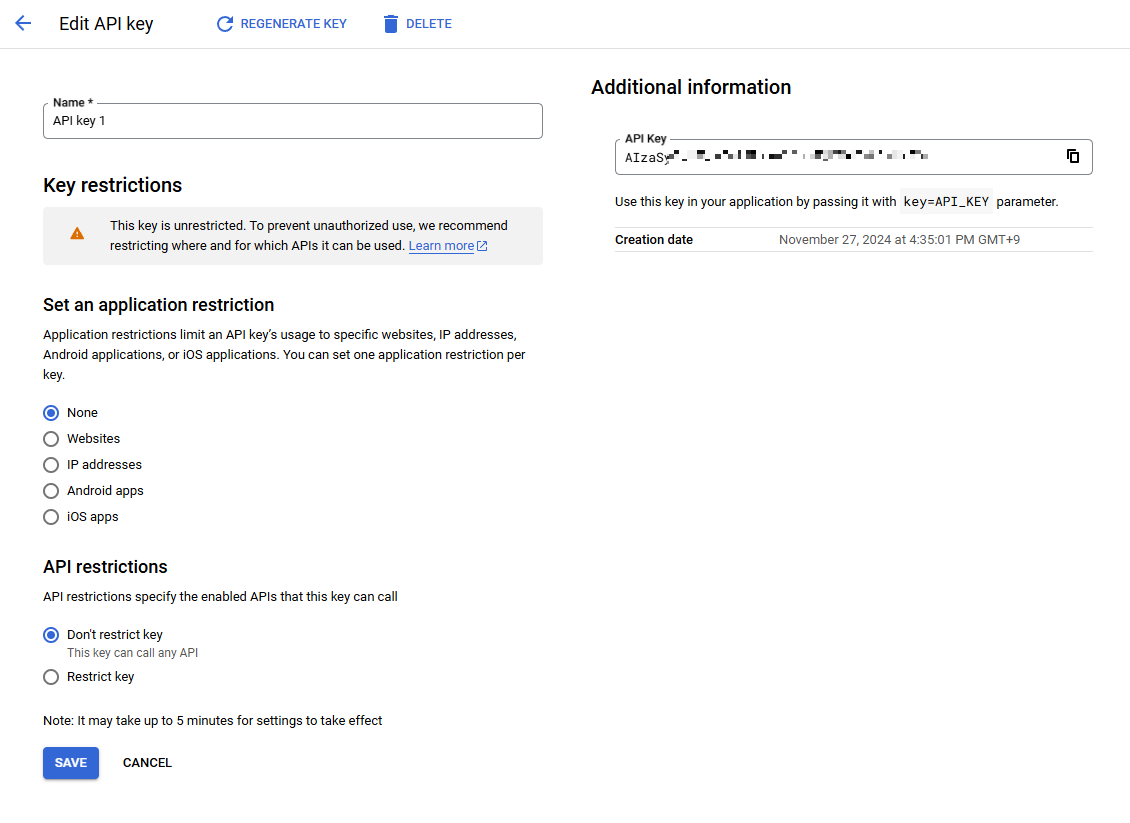
key가 유출되어 다른 사람이 사용하여 사용량이 증가하면 과금이 되거나 API 서비스가 끊길 수 있으므로 추가하시려면 패키지명과 SHA-1 지문을 추가하면 됩니다.
1-3. app.json
위에서 발급 받은 key를 app.json에 명시해 두면 build 시에 자동으로 네이티브 코드에 추가가 됩니다.
{
  "expo": {
  	...
    },
    "android": {
	...
      "config": {
        "googleMaps": {
        	// API key 추가
          "apiKey": "AIzaSyBjU..."
        }
      }
    },
    .
    .
    .
2. 지도 초기 위치 (고정/현재위치)
https://github.com/react-native-maps/react-native-maps/blob/master/docs/mapview.md
react-native-maps/docs/mapview.md at master · react-native-maps/react-native-maps
React Native Mapview component for iOS + Android. Contribute to react-native-maps/react-native-maps development by creating an account on GitHub.
github.com
MapView에서 초기위치를 수동으로 정해주어야 합니다.
이를 위해 위치 권한과 현재 위치를 가져오기 위한 라이브러리를 설치합니다.
npx expo install expo-locationhttps://docs.expo.dev/versions/latest/sdk/location/
Location
A library that provides access to reading geolocation information, polling current location or subscribing location update events from the device.
docs.expo.dev
import { useEffect, useRef, useState } from "react";
import MapView, { PROVIDER_GOOGLE, Region } from "react-native-maps";
import {
  Linking,
  PermissionsAndroid,
  Platform,
  Pressable,
  StyleSheet,
  Text,
} from "react-native";
import * as Location from "expo-location";

export default function HomeScreen() {
  // 초기 위치
  const [initialRegion, setInitialRegion] = useState<Region | null>(null);
  // 위치 권한 상태
  const [hasPermission, setHasPermission] = useState<boolean | null>(null);
  // 다시 묻지 않기
  const [naverAsk, setNaverAsk] = useState(false);

  const mapRef = useRef<MapView>(null);

  useEffect(() => {
    (async () => {
      // 위치 권한 요청
      const { status } = await Location.requestForegroundPermissionsAsync();
      // 권한 허락 시 위치 권한 상태를 true로 변경, 초기 위치 state를 현재 위경도값으로 변경
      if (status === "granted") {
        setHasPermission(true);
        const location = await Location.getCurrentPositionAsync({});
        const initialRegion = {
          latitude: location.coords.latitude,
          longitude: location.coords.longitude,
          // 위경도 차이를 이용한 초기 지도 범위 크기
          // 값이 작을 수록 초기 지도가 확대되어 표시됩니다.
          latitudeDelta: 0.02,
          longitudeDelta: 0.02,
        };
        setInitialRegion(initialRegion);
      } else {
        // 위치 권한 거절 시
        setHasPermission(false);
        // 거절 시 초기 위치를 수동으로 설정할 수 있습니다.
        const initialRegion = {
          latitude: 37.576022,
          longitude: 126.9769,
          latitudeDelta: 0.02,
          longitudeDelta: 0.02,
        };
        setInitialRegion(initialRegion);
      }
    })();
  }, []);

  // 권한 재요청 함수
  const askPermission = async () => {
    if (Platform.OS === "android") {
      const granted = await PermissionsAndroid.request(
        PermissionsAndroid.PERMISSIONS.ACCESS_FINE_LOCATION
      );
      if (granted === "never_ask_again") {
        naverAsk ? Linking.openSettings() : setNaverAsk(true);
        setNaverAsk(true);
      } else if (granted === "granted") {
        setHasPermission(true);
        const location = await Location.getCurrentPositionAsync({});
        const initialRegion = {
          latitude: location.coords.latitude,
          longitude: location.coords.longitude,
          latitudeDelta: 0.02,
          longitudeDelta: 0.02,
        };
        setInitialRegion(initialRegion);
      }
    }
  };

  // 아래 코드를 추가하면 권한 거절 시 지도가 나오지 않고 재요청 버튼만 렌더링 됩니다.
  // 위치 권한이 없어도 지도를 사용할 수 있지만 거절 시 지도를 쓰지 못하게 하려면
  // 아래와 같이 추가하면 됩니다.
  if (hasPermission === false) {
    return (
      <Pressable onPress={askPermission}>
        <Text>권한 재요청</Text>
      </Pressable>
    );
  }

  return (
    // 초기 위치가 설정이 된 후 지도를 불러옵니다.
    // 설정해 놓지 않으면 google map에서 임의로 설정한 초기 위치에서
    // 화면 전환이 이루어 지므로 추가하는 것을 추천합니다.
    initialRegion && (
      <MapView
        style={styles.map}
        // 사용할 지도 타입 (google map)
        provider={PROVIDER_GOOGLE}
        // 초기 위치
        initialRegion={initialRegion}
        ref={mapRef}
        // 지도를 확대/축소할 수 있는 최소/최대 레벨
        maxZoomLevel={16}
        minZoomLevel={13}
      ></MapView>
    )
  );
}

const styles = StyleSheet.create({
  loading: {
    position: "absolute",
    zIndex: 100,
    alignSelf: "center",
    top: "50%",
  },
  map: {
    width: "100%",
    height: "100%",
  },
});
3. 현재 위치 표시

<MapView
style={styles.map}
provider={PROVIDER_GOOGLE}
initialRegion={initialRegion}
ref={mapRef}
// 현재 위치 표시
showsUserLocation
maxZoomLevel={16}
minZoomLevel={13}
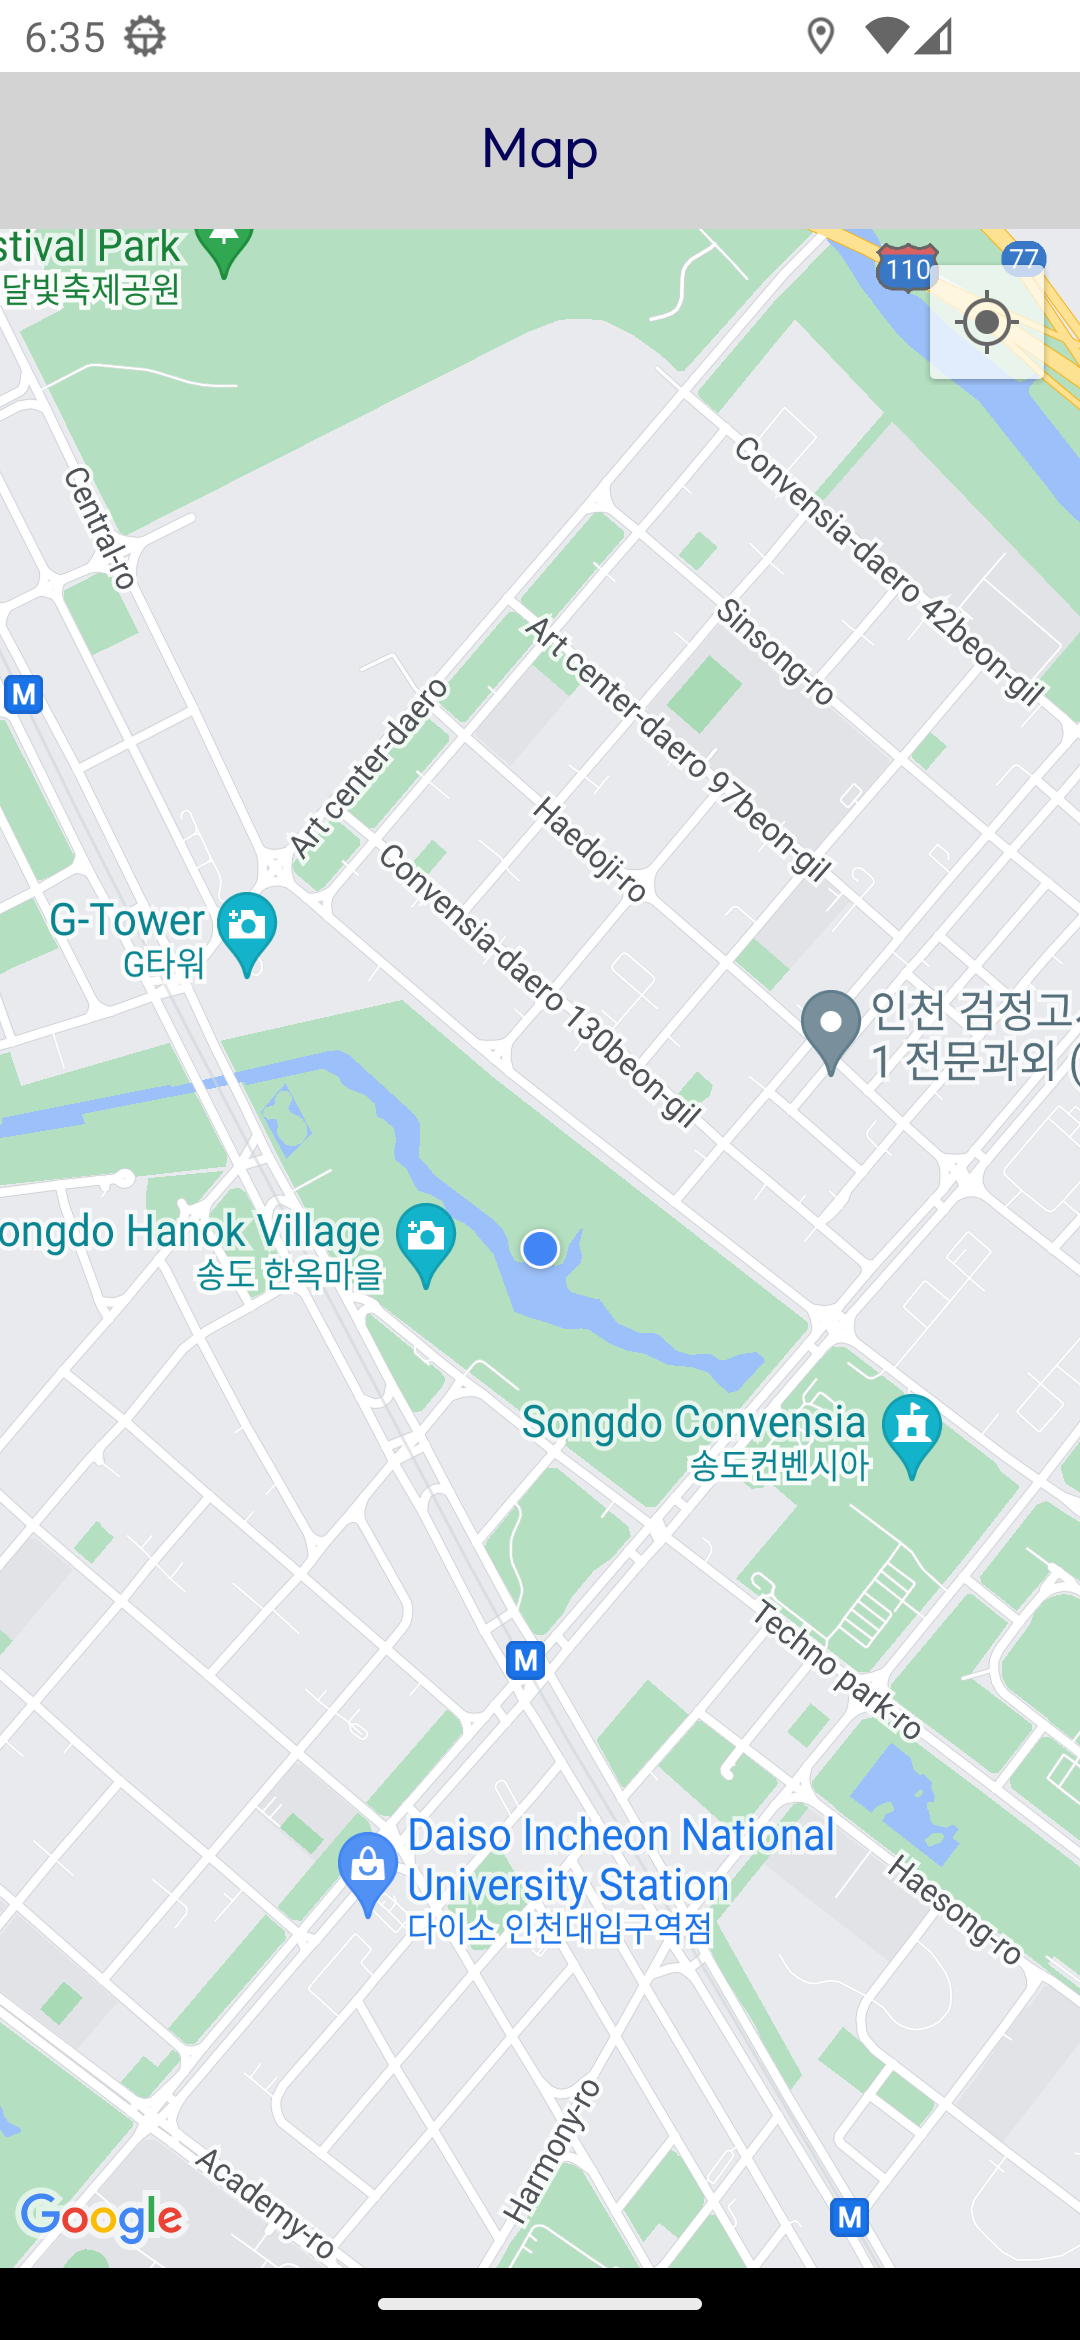
></MapView>MapView에 showsUserLocation 혹은 showsUserLocation={true} 를 추가해 주면 현재 위치가 지도상 파란색 점으로 표시됩니다.
문서에 나와있듯이 권한이 없다면 현재 위치는 보이지 않으며 기본값(default)이 false 이기 때문에 명시를 하지 않는다면 표시가 되지 않습니다.
4. 현재 위치 이동 버튼 (커스텀)

showsUserLocation 옵션을 사용하면 기본적으로 현재 위치로 버튼이 활성화됩니다.
따라서 현재 위치만 표시하고 현재 위치로 버튼을 비활성화하려면 showsMyLocationButton 옵션을 false로 변경해 주면 됩니다.

// 좌측 부터

1.    <MapView
        style={styles.map}
        provider={PROVIDER_GOOGLE}
        initialRegion={initialRegion}
        ref={mapRef}
        maxZoomLevel={16}
        minZoomLevel={13}
      ></MapView>

2.    <MapView
        style={styles.map}
        provider={PROVIDER_GOOGLE}
        initialRegion={initialRegion}
        ref={mapRef}
        // 현재 위치 표시
        showsUserLocation={true}
        maxZoomLevel={16}
        minZoomLevel={13}
      ></MapView>

3.    <MapView
        style={styles.map}
        provider={PROVIDER_GOOGLE}
        initialRegion={initialRegion}
        ref={mapRef}
        // 현재 위치 표시
        showsUserLocation={true}
        // 현재 위치로 버튼 제거
        showsMyLocationButton={false}
        maxZoomLevel={16}
        minZoomLevel={13}
      ></MapView>
하지만 기본 버튼을 변경하고 싶을 때가 있습니다.
1. 기본 버튼의 UI가 마음에 들지 않을 때
2. 기본 버튼의 위치가 마음에 들지 않을 때
3. 버튼이 특정 상황에 활성화되어야 할 때
	// 1. useRef 선언
  const mapRef = useRef<MapView>(null);

	// 4. 커스텀 버튼 눌렀을 때 호출되는 함수
  const moveToCurrentLocation = async () => {
  	// 현재 위치 가져오기
    const location = await Location.getCurrentPositionAsync({});
    const region = {
      latitude: location.coords.latitude,
      longitude: location.coords.longitude,
      latitudeDelta: 0.02,
      longitudeDelta: 0.02,
    };
    // MapView를 현재 위치의 중심으로 이동
    // 1000밀리초 = 1초 동안 애니메이션 효과와 함께 이동
    mapRef.current?.animateToRegion(region, 1000);
  };

  return (
    initialRegion && (
      <>
      	// 3. 커스텀 버튼 추가
        <Pressable style={styles.myLocationBtn} onPress={moveToCurrentLocation}>
          <FontAwesome6 name="location-crosshairs" size={30} color="black" />
        </Pressable>
        <MapView
          style={styles.map}
          provider={PROVIDER_GOOGLE}
          initialRegion={initialRegion}
          // 2. MapView에 ref 추가
          ref={mapRef}
          showsUserLocation={true}
          showsMyLocationButton={false}
          maxZoomLevel={16}
          minZoomLevel={13}
        ></MapView>
      </>
    )
  );
};

const styles = StyleSheet.create({
  myLocationBtn: {
    position: "absolute",
    zIndex: 100,
    top: 20,
    right: 20,
  },
  map: {
    width: "100%",
    height: "100%",
  },
});
5. 지도 이동 시 동작 (예: 현재 위치 재검색)
앱에서 지도를 사용할 때 현재 위치에서 검색 또는 이동 중/이동 후 특정 로직이 필요할 때가 있습니다.
지도가 움직일 때마다 특정 로직을 하고 싶다면 onRegionChange 옵션을 추가하면 됩니다.
        <MapView
          style={styles.map}
          provider={PROVIDER_GOOGLE}
          initialRegion={initialRegion}
          ref={mapRef}
          showsUserLocation={true}
          showsMyLocationButton={false}
          // 지도가 움직일 때 마다 region을 로그로 출력
          onRegionChange={(region) => {console.log(region)}}
          maxZoomLevel={16}
          minZoomLevel={13}
        ></MapView>


 LOG  {"latitude": 37.392865740643245, "latitudeDelta": 0.02999979448919987,
 "longitude": 126.64084615185857, "longitudeDelta": 0.02000022679565916}
 LOG  {"latitude": 37.39290569667292, "latitudeDelta": 0.029999778498179808,
 "longitude": 126.64084615185857, "longitudeDelta": 0.02000022679565916}
 LOG  {"latitude": 37.39295071377418, "latitudeDelta": 0.029999760481587145,
 "longitude": 126.64084615185857, "longitudeDelta": 0.02000022679565916}
만약 이동 중이 아닌 이동이 완료된 후에 로직을 추가하고 싶다면 onRegionChangeComplete를 추가하면 됩니다.
const mapRef = useRef<MapView>(null);
const moveToCurrentLocation = async () => {
const location = await Location.getCurrentPositionAsync({});
const region = {
latitude: location.coords.latitude,
longitude: location.coords.longitude,
latitudeDelta: 0.02,
longitudeDelta: 0.02,
};
mapRef.current?.animateToRegion(region, 1000);
setIsMoved(false);
};
// 이동 상태 관리
const [isMoved, setIsMoved] = useState<boolean>(false);
// 이동 완료 후 호출되는 함수
const onRegionChangeComplete = () => {
setIsMoved(true);
};
return (
initialRegion && (
<>
// 이동하였을 때만 버튼 호출
{isMoved && (
<Pressable
style={styles.myLocationBtn}
onPress={moveToCurrentLocation}
>
<FontAwesome6 name="location-crosshairs" size={30} color="black" />
</Pressable>
)}
<MapView
style={styles.map}
provider={PROVIDER_GOOGLE}
initialRegion={initialRegion}
ref={mapRef}
showsUserLocation={true}
showsMyLocationButton={false}
// 이동 완료 시 호출
onRegionChangeComplete={onRegionChangeComplete}
maxZoomLevel={16}
minZoomLevel={13}
></MapView>
</>
)
);
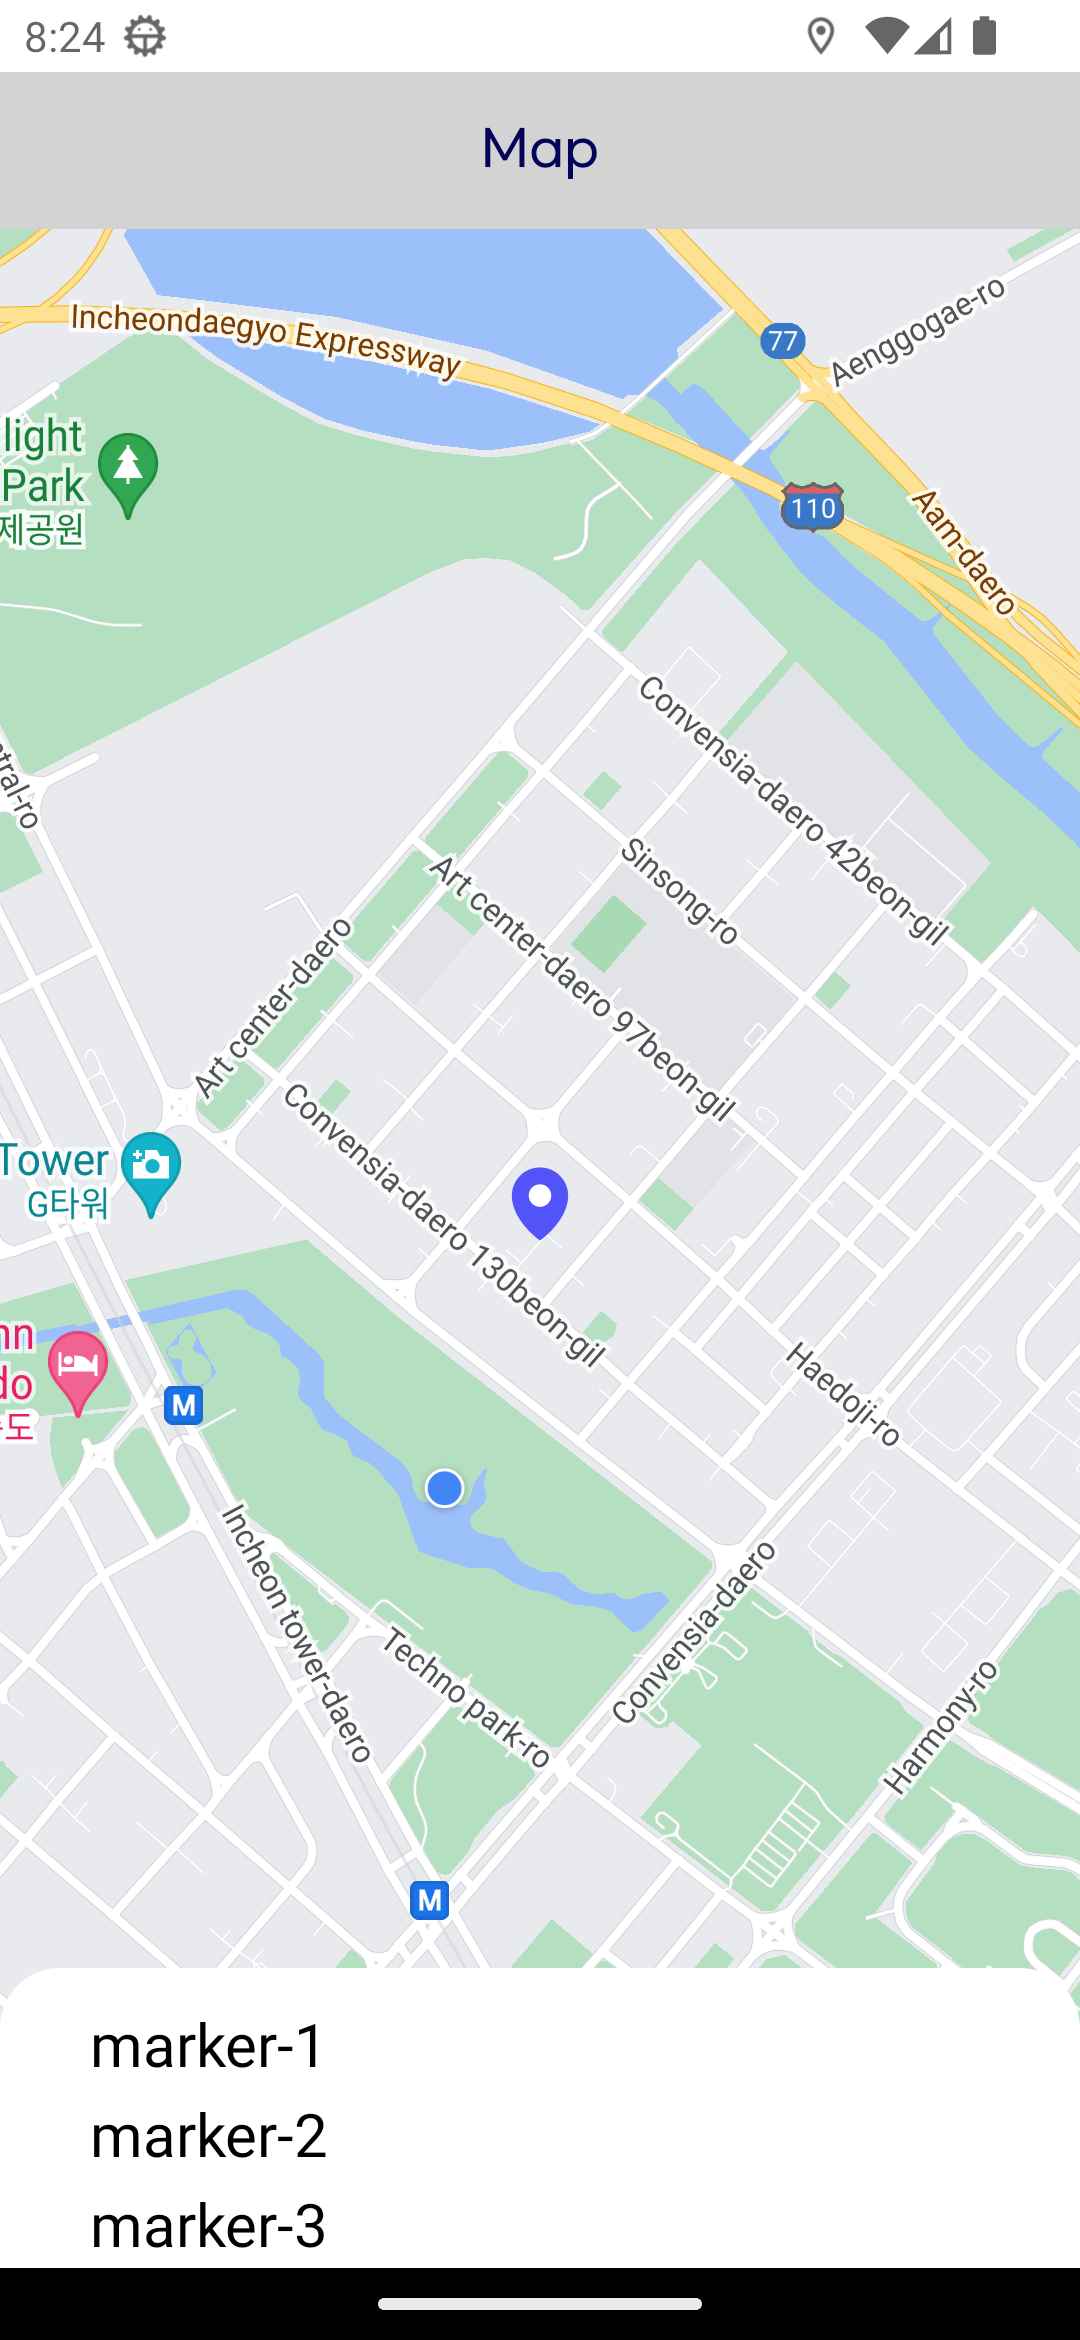
};6. 지도에 마커 표시 (커스텀)
https://github.com/react-native-maps/react-native-maps/blob/master/docs/marker.md
react-native-maps/docs/marker.md at master · react-native-maps/react-native-maps
React Native Mapview component for iOS + Android. Contribute to react-native-maps/react-native-maps development by creating an account on GitHub.
github.com
// 마커 배열
const markers = [
{
no: 1,
name: "marker-1",
description: "marker-1 description",
coordinate: {
latitude: 37.39579392845674,
longitude: 126.64145534858108,
},
},
{
no: 2,
name: "marker-2",
description: "marker-2 description",
coordinate: {
latitude: 37.39707112910085,
longitude: 126.6373391635716,
},
},
{
no: 3,
name: "marker-3",
description: "marker-3 description",
coordinate: {
latitude: 37.399315966244664,
longitude: 126.64468405768275,
},
},
];
return (
initialRegion && (
<MapView
style={styles.map}
provider={PROVIDER_GOOGLE}
initialRegion={initialRegion}
ref={mapRef}
showsUserLocation={true}
showsMyLocationButton={false}
maxZoomLevel={16}
minZoomLevel={13}
>
{
markers.map((marker) => (
// MapView의 Marker 메서드
<Marker
key={marker.no}
// Marker의 위경도
coordinate={marker.coordinate}
/>
))
}
</MapView>
)
);
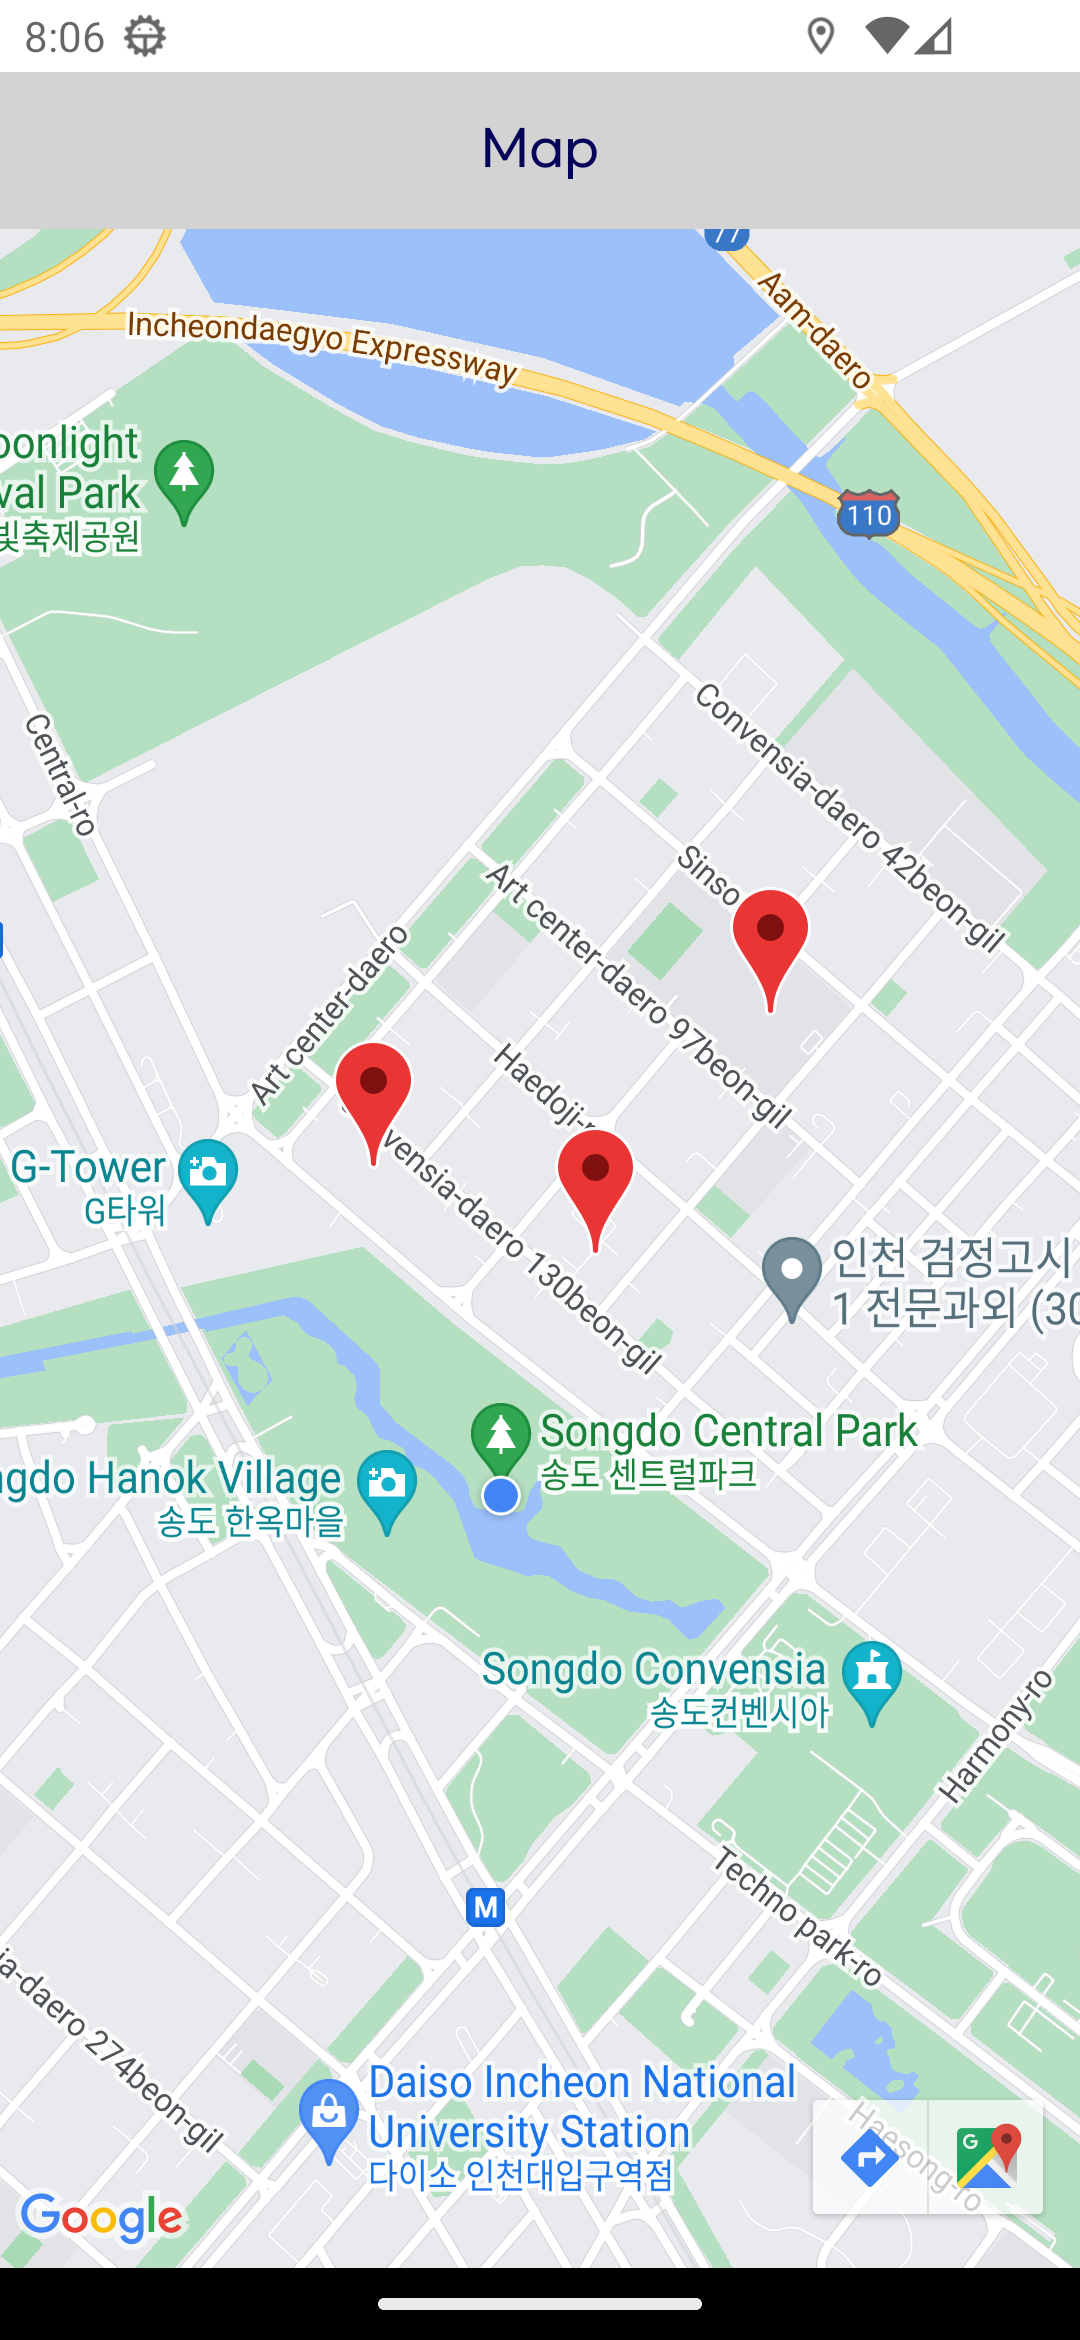
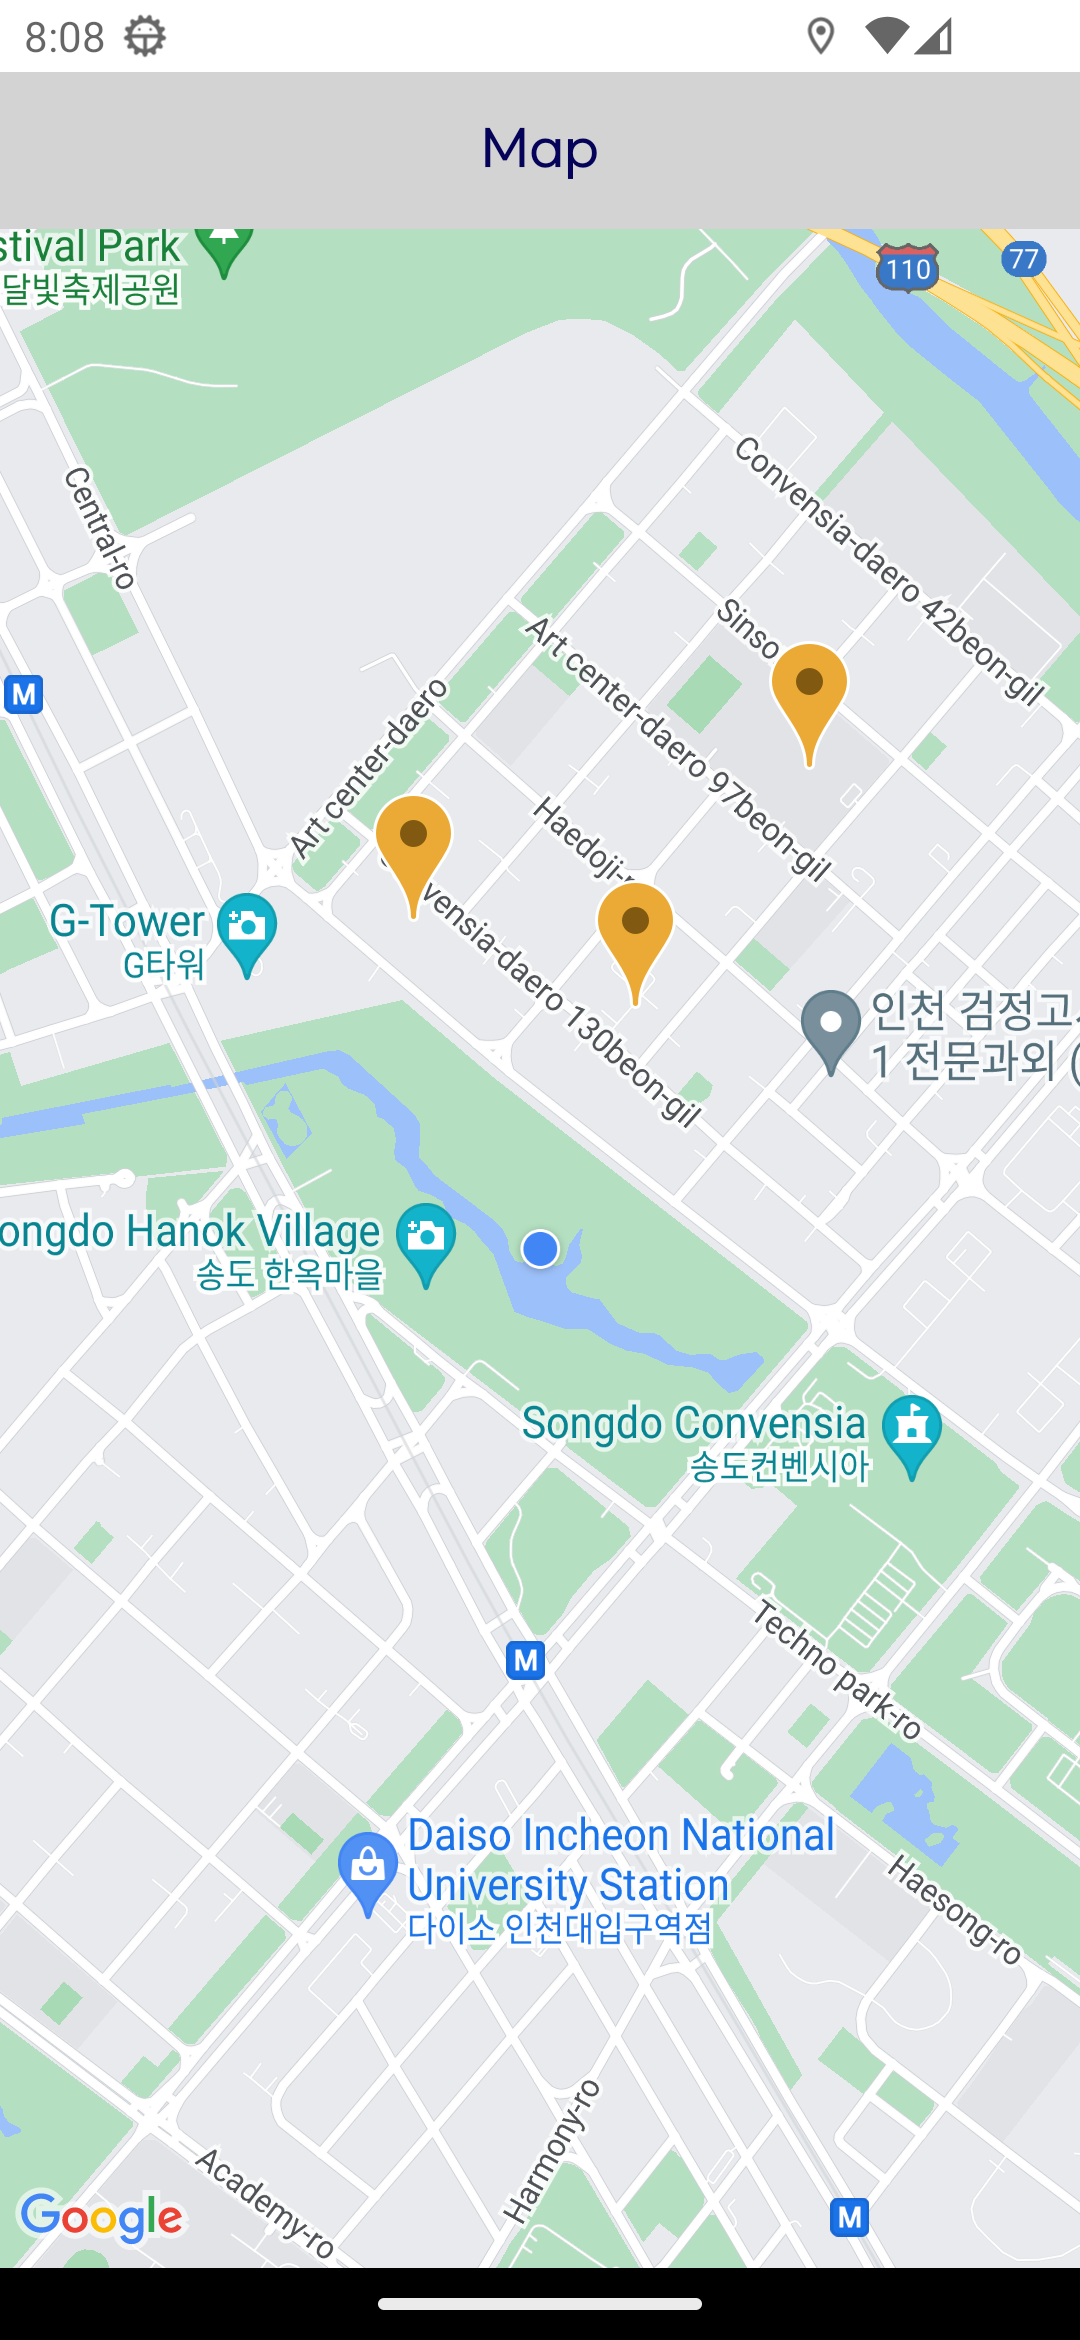
};지도에 표시된 마커의 색을 변경할 수 있습니다.
{
  markers.map((marker) => (
    <Marker
      key={marker.no}
      coordinate={marker.coordinate}
      // 마커 색상
      pinColor="orange"
    />
  ))
}
하지만 변경 가능한 색상이 매우 한정적이기 때문에 기본 마커의 색을 변경해 쓰는 것보단 마커 이미지를 넣는 것을 추천드립니다.
https://github.com/react-native-maps/react-native-maps/issues/887
Change pinColor of MapView.Marker to Black · Issue #887 · react-native-maps/react-native-maps
The color of MapView.Marker does not seem to change from the default red color even after assigning a color to pinColor. Is something wrong? { this.state.markers.map(marker => { return ( <MapView.M...
github.com
{markers.map((marker) => (
  <Marker
    key={marker.no}
    coordinate={marker.coordinate}
    pinColor="orange"
    // 마커 이미지 추가
    image={require("@/assets/icons/marker/marker.png")}
  />
))}

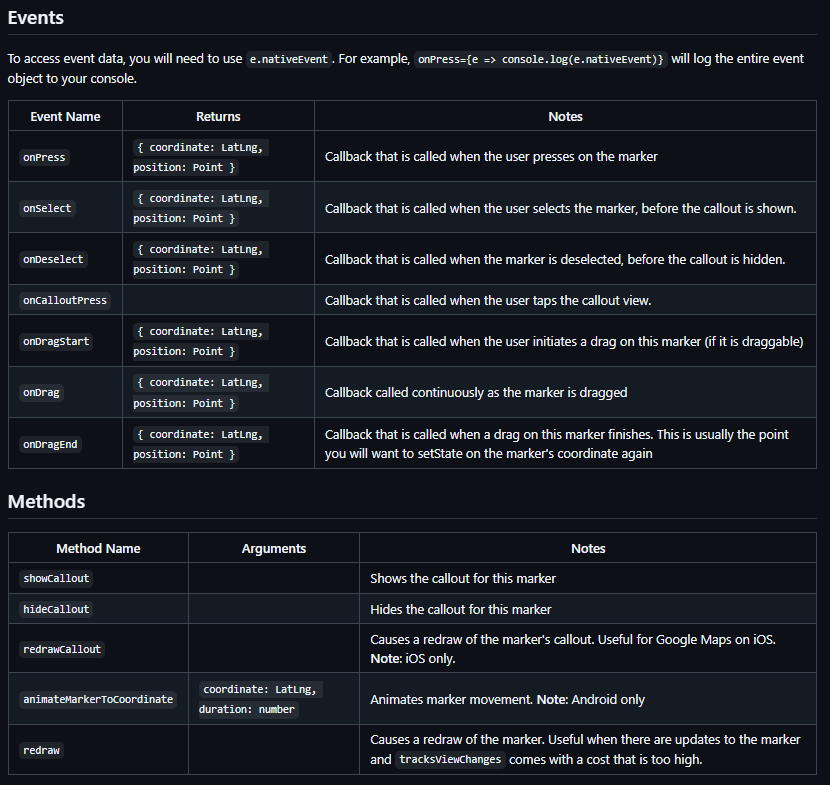
기본적으로 마커를 클릭하면 화면의 중심으로 이동하게 되는데 클릭 혹은 선택, 드래그했을 때 추가적인 로직을 원한다면 공식문서를 참고하시면 됩니다.
하단의 메서드는 callout에 관련된 것으로 7번에서 다루도록 하겠습니다.
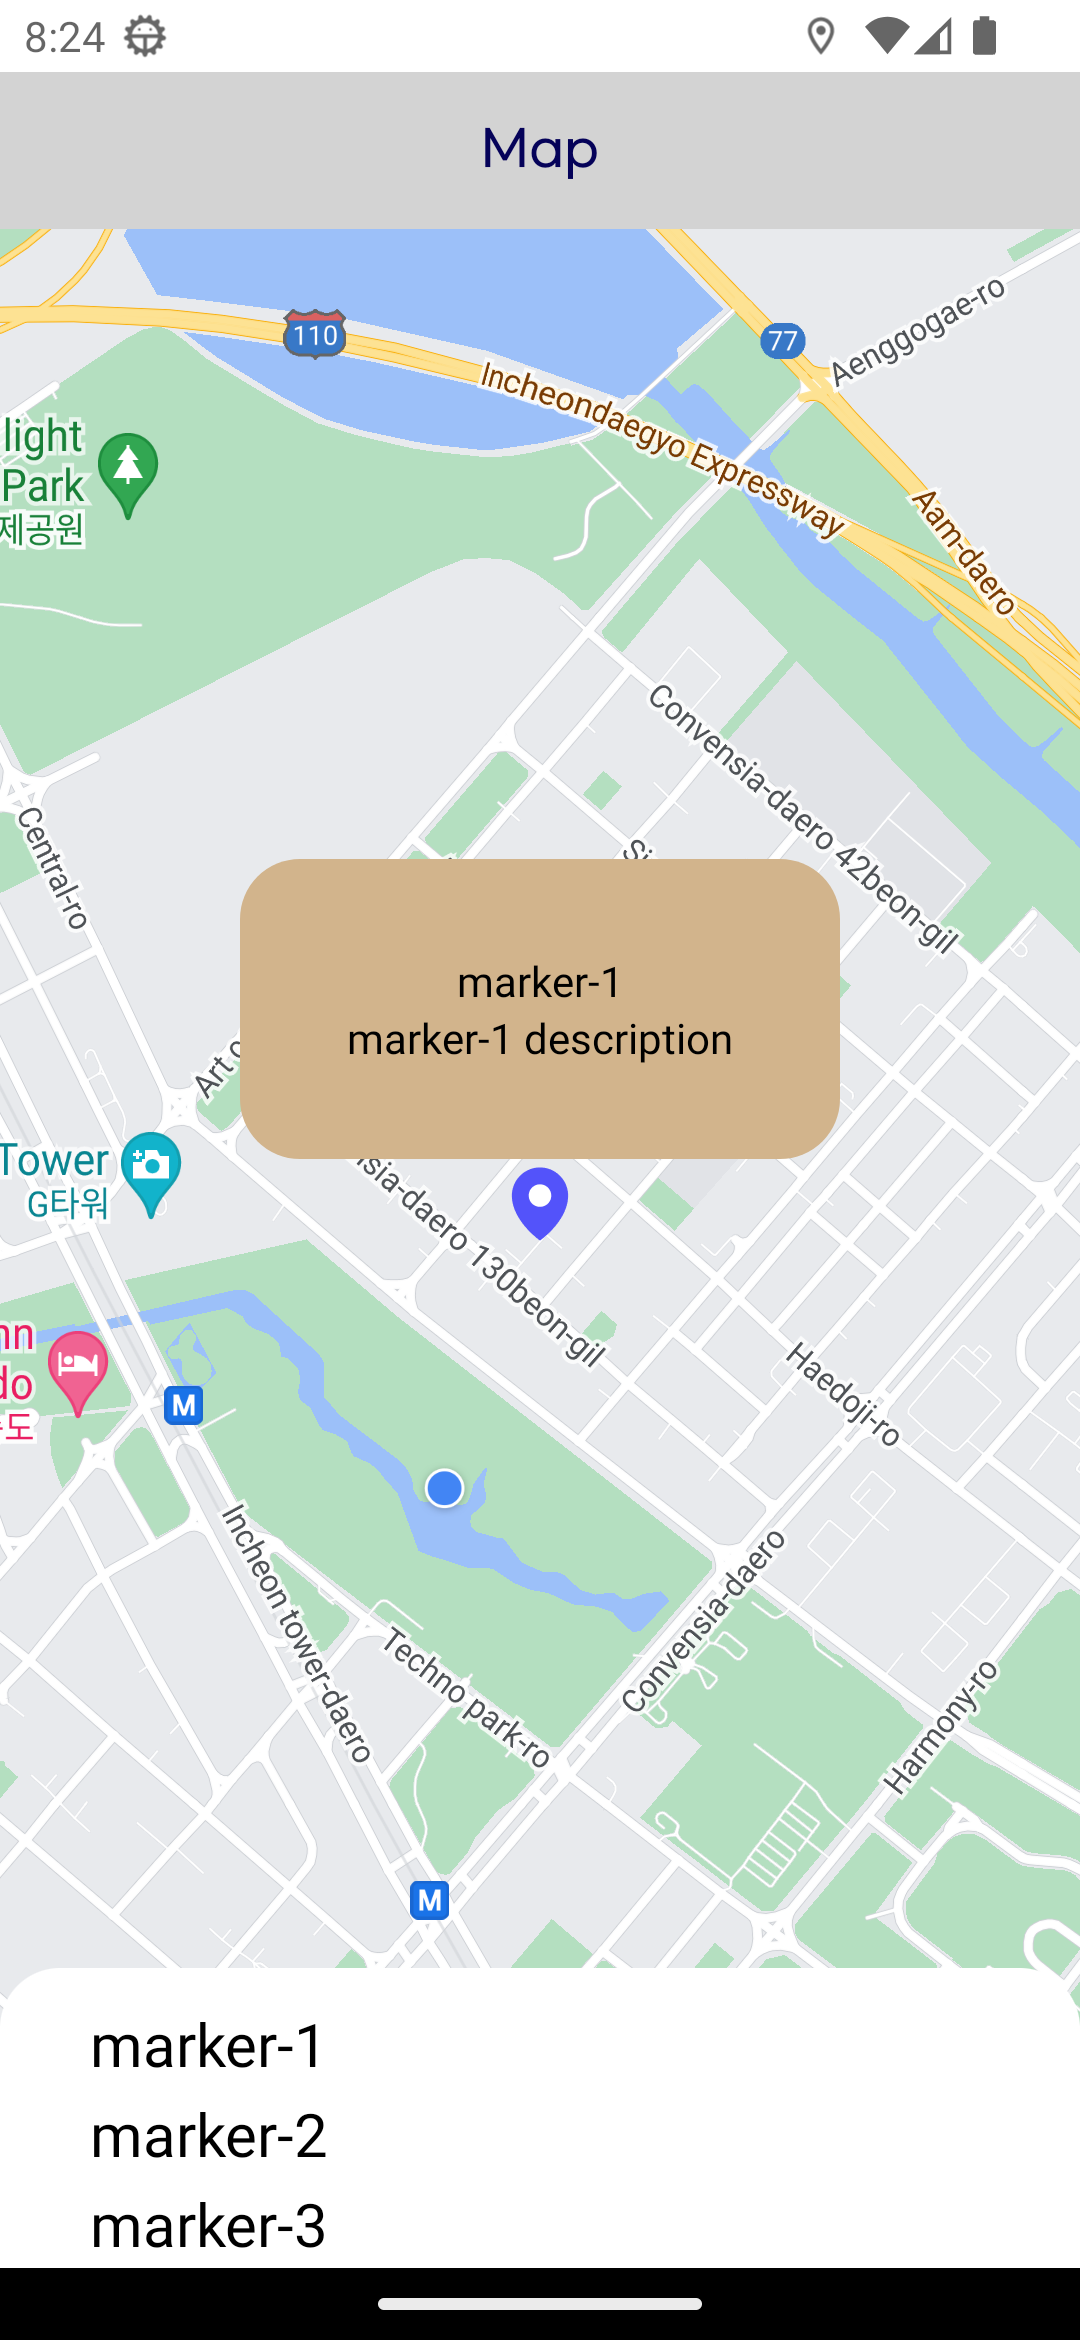
7. 마커 선택 시 말풍선(callout) 표시 (커스텀)
https://github.com/react-native-maps/react-native-maps/blob/master/docs/callout.md
react-native-maps/docs/callout.md at master · react-native-maps/react-native-maps
React Native Mapview component for iOS + Android. Contribute to react-native-maps/react-native-maps development by creating an account on GitHub.
github.com
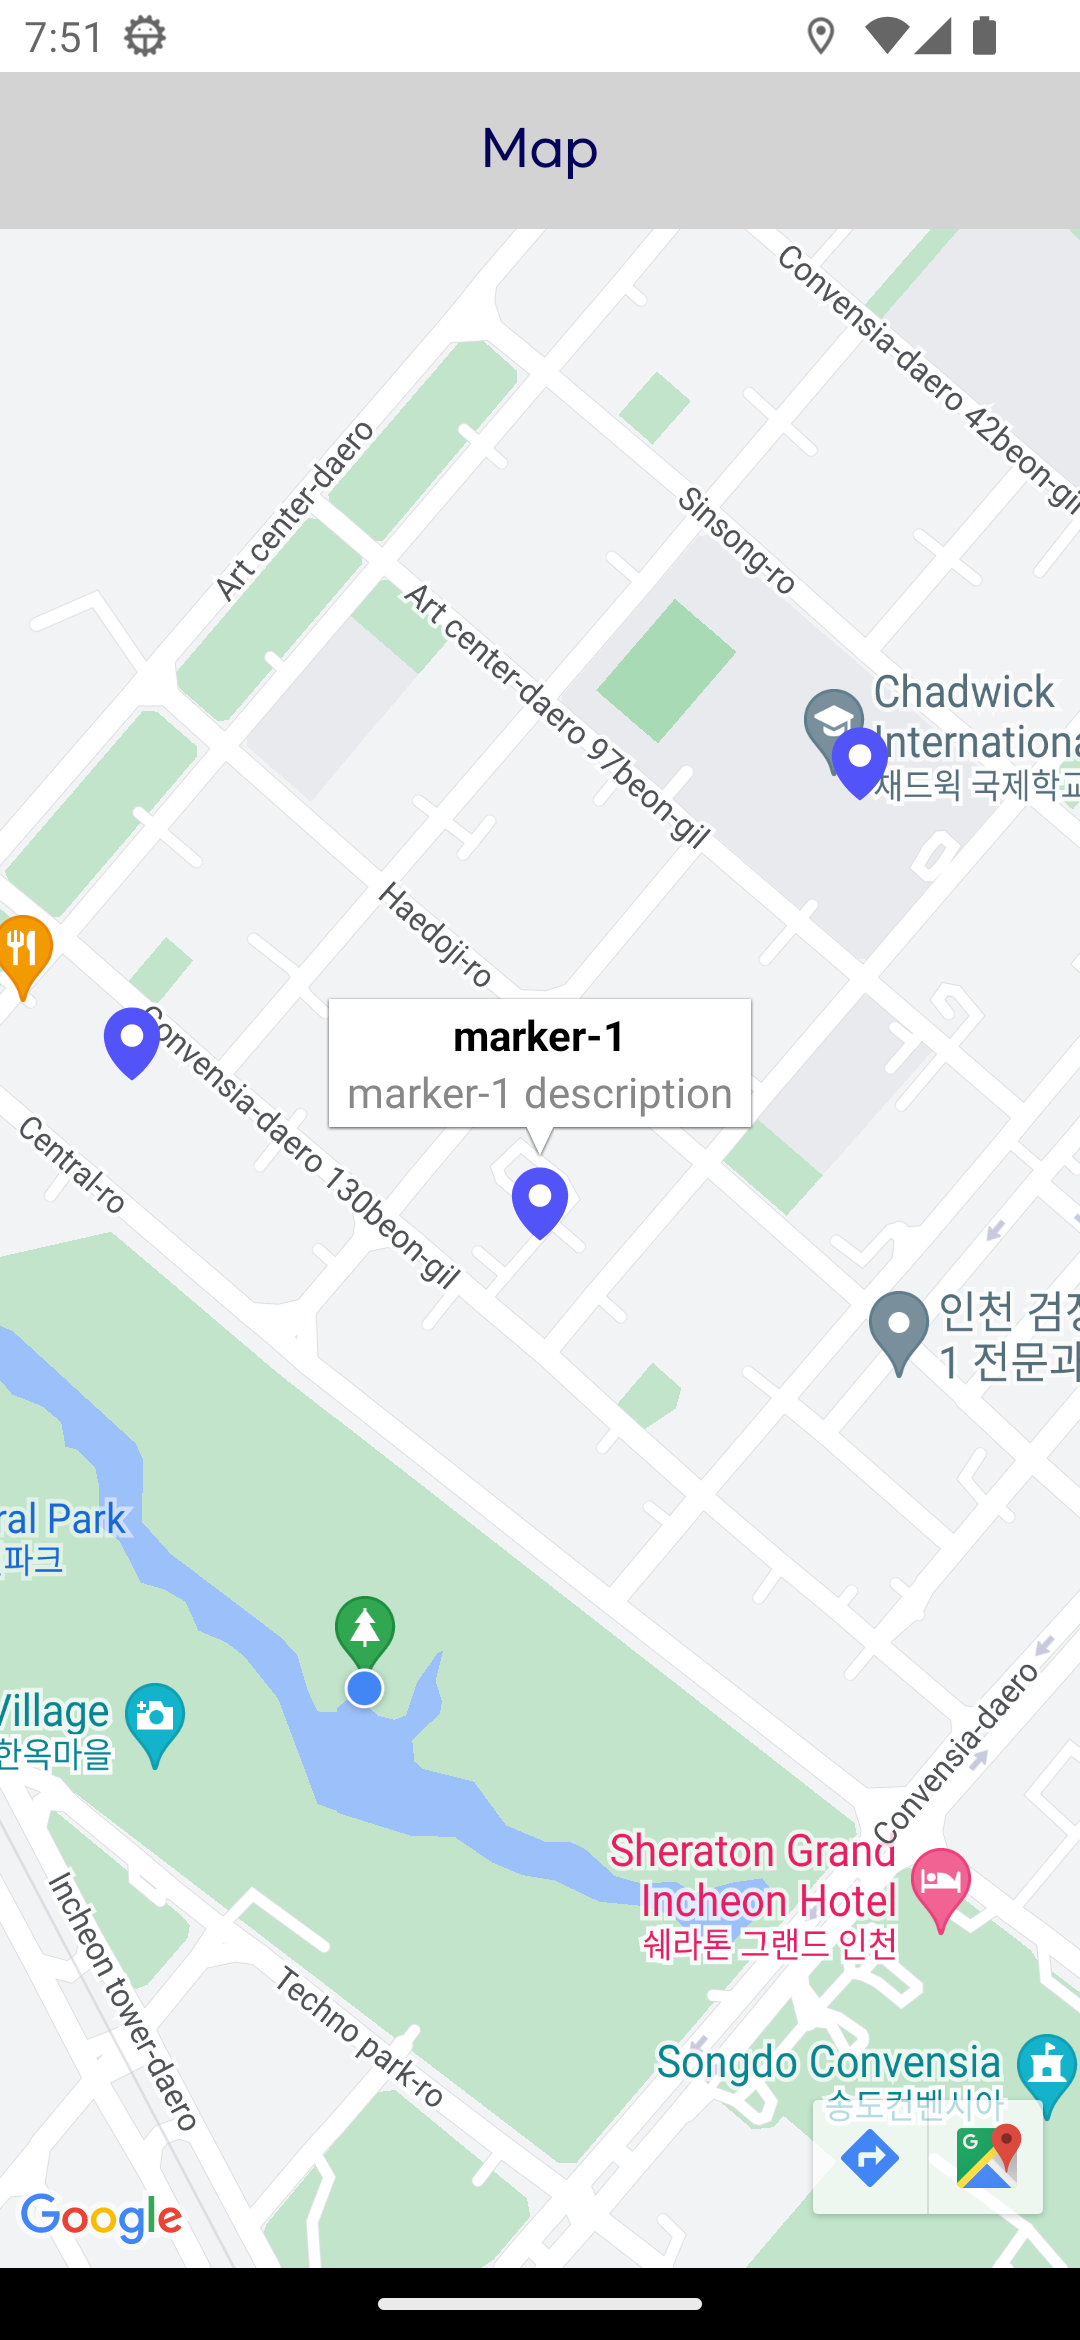
만약 기본으로 제공하는 callout을 적용하고 싶다면 아래와 같이 marker 데이터에 있는 것을 사용할 수 있습니다.
const markers = [
{
no: 1,
name: "marker-1",
description: "marker-1 description",
coordinate: {
latitude: 37.39579392845674,
longitude: 126.64145534858108,
},
},
.
.
.
<Marker
key={marker.no}
coordinate={marker.coordinate}
pinColor="orange"
image={require("@/assets/icons/marker/marker.png")}
// 기본 callout 내용
title={marker.name}
description={marker.description}
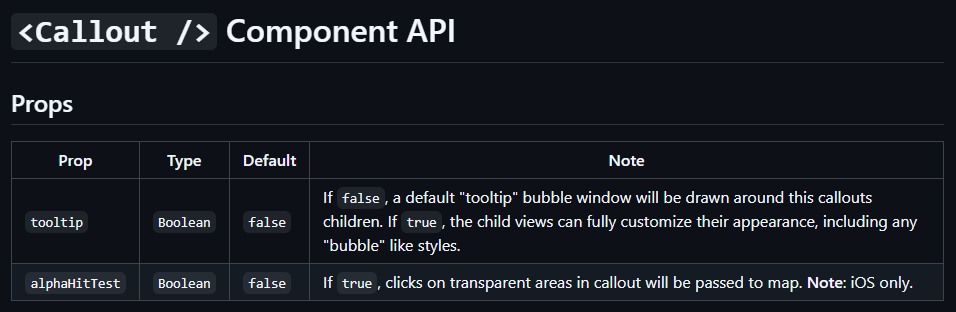
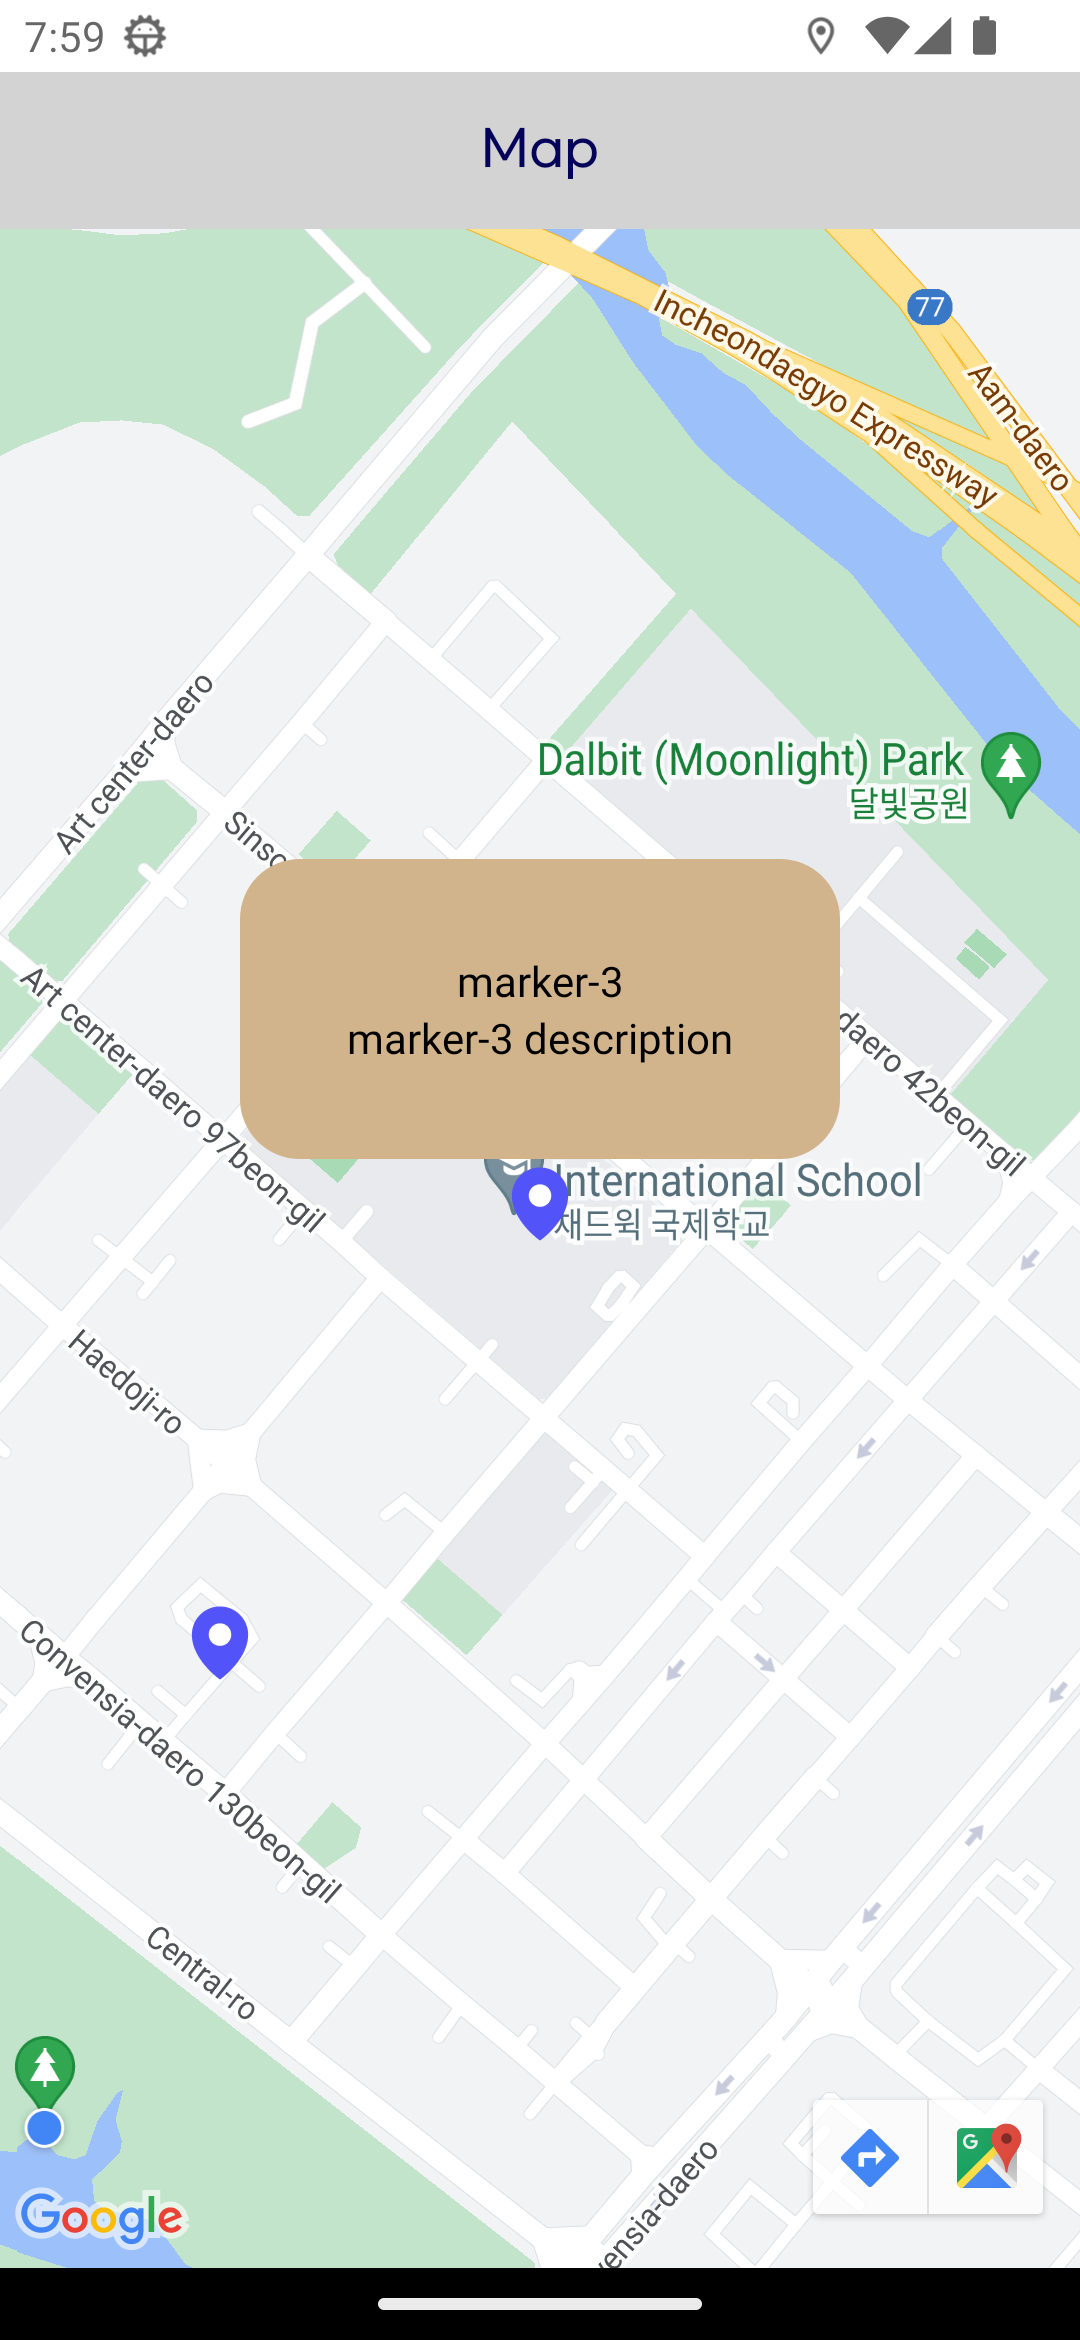
/>하지만 UI가 좋지 않기 때문에 대부분의 경우 커스텀을 하게 됩니다. 기본 callout이 아닌 사용자 정의 커스텀을 사용하려면 우선 callout 컴포넌트를 추가하고 tooltip 옵션을 켜주어야 합니다.
  <Marker
            key={marker.no}
            coordinate={marker.coordinate}
            pinColor="orange"
            image={require("@/assets/icons/marker/marker.png")}
          >
          // 커스텀 callout 사용
            <Callout tooltip={true}>
            // 커스텀 callout
              <View style={styles.calloutContainer}>
                <Text>{marker.name}</Text>
                <Text>{marker.description}</Text>
              </View>
            </Callout>
          </Marker>
.
.
.
const styles = StyleSheet.create({
  map: {
    width: "100%",
    height: "100%",
  },
  calloutContainer: {
    width: 200,
    height: 100,
    backgroundColor: "tan",
    borderRadius: 20,
    flexDirection: "column",
    alignItems: "center",
    justifyContent: "center",
  },
});
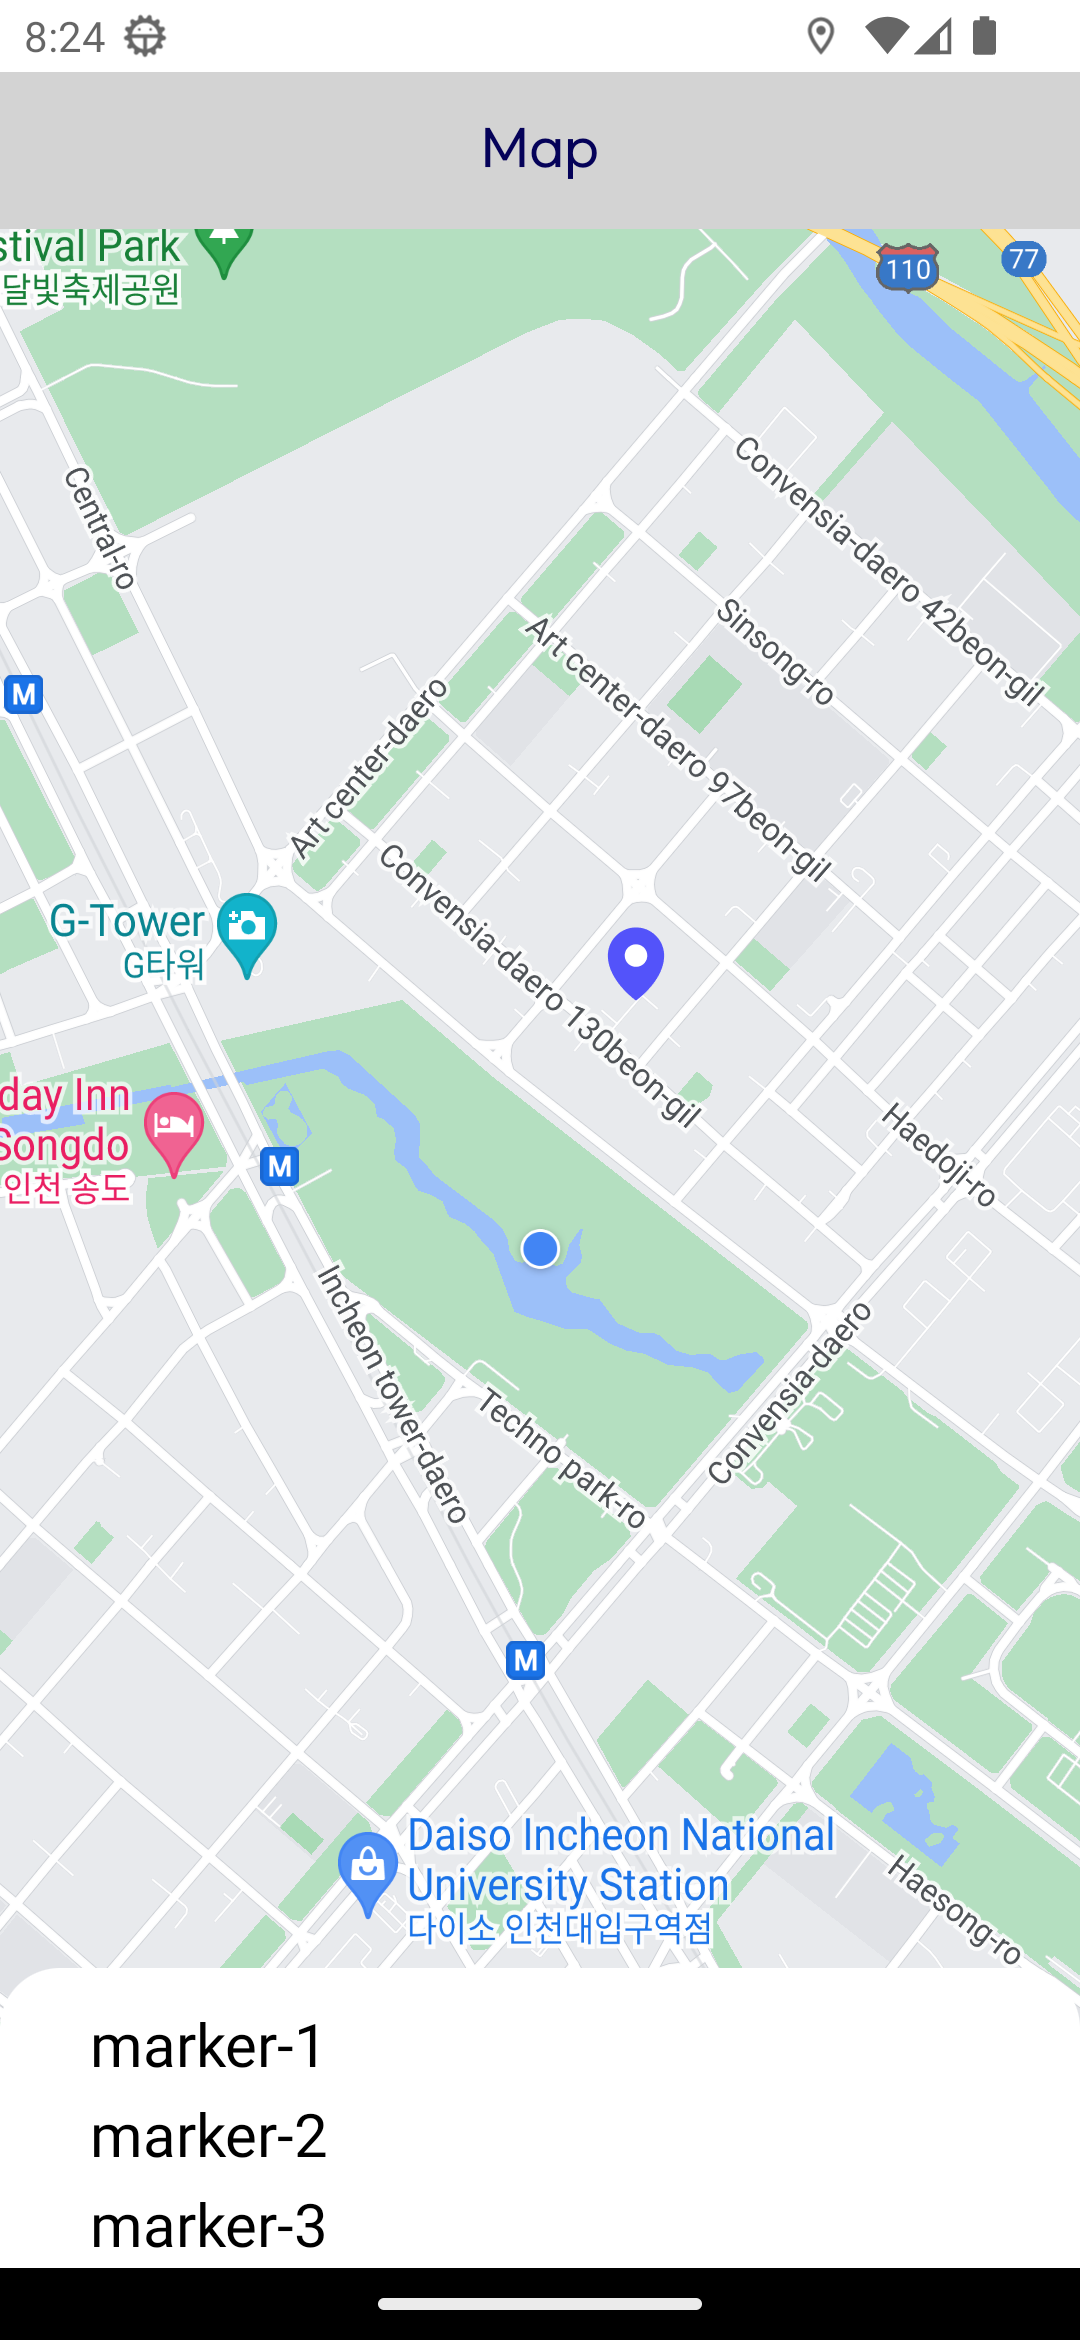
8. 검색 리스트 선택 시 해당 위치로 이동+마커+말풍선
마커 데이터에서 검색한 결과를 선택했을 때 이동하는 로직이 필요할 때가 있습니다.
이번 마지막 단계에선 총 세 가지 동작을 하는 로직을 구현할 것입니다.
1. 해당 마커 활성화
2. 해당 마커로 지도 이동
3. 해당 마커 말풍선 활성화
8-1. 해당 마커 활성화
// 선택한 마커의 정보를 담는 state
const [selectedStore, setSelectedStore] = useState<Marker | null>(null);

// 선택한 마커 참조 ref
  const selectedMarkerRef = useRef<MapMarker>(null);

return (
    initialRegion && (
      <>
        <MapView
          style={styles.map}
          provider={PROVIDER_GOOGLE}
          initialRegion={initialRegion}
          ref={mapRef}
          showsUserLocation={true}
          showsMyLocationButton={false}
          maxZoomLevel={16}
          minZoomLevel={13}
        >

        // 선택된 마커 selectedStore가 null이 아닐 때
          {selectedStore && (

          // 해당 마커 렌더링
            <Marker
            // 선택한 마커 참조 ref
              ref={selectedMarkerRef}
              key={selectedStore.no}
              coordinate={{
                latitude: selectedStore.coordinate.latitude,
                longitude: selectedStore.coordinate.longitude,
              }}
              image={require("@/assets/icons/marker/marker.png")}
            >
            </Marker>
          )}
        </MapView>

        // 아이템 목록
        <View style={styles.bottomSheet}>
          {markers.map((marker) => (
          // 선택 시 state에 해당 아이템 정보 저장
            <Pressable onPress={() => setSelectedStore(marker)}>
              <Text style={styles.bottomSheetText}>{marker.name}</Text>
            </Pressable>
          ))}
        </View>
      </>
    )
  );
8-2. 해당 마커로 지도 이동
const [selectedStore, setSelectedStore] = useState<Marker | null>(null);

  const selectedMarkerRef = useRef<MapMarker>(null);

// 아이템을 선택할 때 마다 지도 이동
  useEffect(() => {
    if (selectedStore && mapRef.current) {

    // mapRef가 MapView를 참조 중이므로 해당 지도 이동
      mapRef.current.animateToRegion(
        {
        // 선택한 마커의 위치
          latitude: selectedStore.coordinate.latitude,
          longitude: selectedStore.coordinate.longitude,
          latitudeDelta: 0.02,
          longitudeDelta: 0.02,
        },
        1000
      );
    }
  }, [selectedStore]);

  return (
    initialRegion && (
      <>
        <MapView
          style={styles.map}
          provider={PROVIDER_GOOGLE}
          initialRegion={initialRegion}
          // 위 useEffect에서 이동할 지도
          ref={mapRef}
          showsUserLocation={true}
          showsMyLocationButton={false}
          maxZoomLevel={16}
          minZoomLevel={13}
        >
          {selectedStore && (
            <Marker
              ref={selectedMarkerRef}
              key={selectedStore.no}
              coordinate={{
                latitude: selectedStore.coordinate.latitude,
                longitude: selectedStore.coordinate.longitude,
              }}
              image={require("@/assets/icons/marker/marker.png")}
            >
            </Marker>
          )}
        </MapView>
        <View style={styles.bottomSheet}>
          {markers.map((marker) => (
            <Pressable onPress={() => setSelectedStore(marker)}>
              <Text style={styles.bottomSheetText}>{marker.name}</Text>
            </Pressable>
          ))}
        </View>
      </>
    )
  );
8-3. 해당 마커 말풍선 활성화
  const [selectedStore, setSelectedStore] = useState<Marker | null>(null);

  const selectedMarkerRef = useRef<MapMarker>(null);

  useEffect(() => {
    if (selectedStore && mapRef.current) {
    // 선택한 마커의 말풍선을 활성화
    // showCallout()
      if (selectedMarkerRef.current) {
        selectedMarkerRef.current.showCallout();
      }
      mapRef.current.animateToRegion(
        {
          latitude: selectedStore.coordinate.latitude,
          longitude: selectedStore.coordinate.longitude,
          latitudeDelta: 0.02,
          longitudeDelta: 0.02,
        },
        1000
      );
    }
  }, [selectedStore]);

  return (
    initialRegion && (
      <>
        <MapView
          style={styles.map}
          provider={PROVIDER_GOOGLE}
          initialRegion={initialRegion}
          ref={mapRef}
          showsUserLocation={true}
          showsMyLocationButton={false}
          maxZoomLevel={16}
          minZoomLevel={13}
        >
          {selectedStore && (
            <Marker
              ref={selectedMarkerRef}
              key={selectedStore.no}
              coordinate={{
                latitude: selectedStore.coordinate.latitude,
                longitude: selectedStore.coordinate.longitude,
              }}
              image={require("@/assets/icons/marker/marker.png")}
            >
            // 선택된 마커의 말풍선 렌더링
              <Callout tooltip={true}>
                <View style={styles.calloutContainer}>
                  <Text>{selectedStore.name}</Text>
                  <Text>{selectedStore.description}</Text>
                </View>
              </Callout>
            </Marker>
          )}
        </MapView>
        <View style={styles.bottomSheet}>
          {markers.map((marker) => (
            <Pressable onPress={() => setSelectedStore(marker)}>
              <Text style={styles.bottomSheetText}>{marker.name}</Text>
            </Pressable>
          ))}
        </View>
      </>
    )
  );
google 지도보단 카카오/네이버 지도가 더 익숙하고 활용하기 쉽겠지만, Expo에선 react native cli로 eject 하지 않는 이상 아직 사용할 방법이 없는 것 같습니다.
하지만 본 포스팅에서 사용한 로직들로 대부분의 지도 기능을 구현할 수 있습니다.
다른 라이브러리 대비 공식문서가 자세히 나와있으니 추가로 필요한 기능들은 참고하시면 도움이 될 것입니다.
https://github.com/react-native-maps/react-native-maps?tab=readme-ov-file#mapview-events
GitHub - react-native-maps/react-native-maps: React Native Mapview component for iOS + Android
React Native Mapview component for iOS + Android. Contribute to react-native-maps/react-native-maps development by creating an account on GitHub.
github.com
8-3. 해당 마커 말풍선 활성화까지 완료된 전체 코드는 아래 리포지토리에서 확인할 수 있습니다.
⚠️ 해당 코드 사용 시 반드시 app.json > expo > android > config > googleMaps > apiKey 를
1-2. google map API key에서 발급 받은 키로 수정하세요.
https://github.com/yeonhub/yeonhub-post/tree/map
GitHub - yeonhub/yeonhub-post
Contribute to yeonhub/yeonhub-post development by creating an account on GitHub.
github.com