
Firebase Analytics는 사용자들이 앱을 어떻게 사용하는지, 어떤 기능이 인기 있는지, 앱 사용 중 어떤 행동들이 자주 일어나는지 등을 알 수 있게 해주는 도구입니다. 이 데이터를 기반으로 앱을 개선할 수 있고, 사용자 경험을 더 좋게 만들 수 있습니다.
앱을 운영하면서 "사용자가 내 앱을 어떻게 사용할까?"라는 궁금증이 들 때, Firebase Analytics가 큰 도움이 됩니다. 예를 들어, "어떤 화면을 오래 보고, 어떤 버튼을 자주 클릭하는지" 등을 알 수 있습니다. 그래서 이 데이터를 통해 앱을 더 효과적으로 개선할 수 있게 됩니다.
1. Firebase/app, Firebase/analytics 설치
https://rnfirebase.io/analytics/usage#installation
Analytics | React Native Firebase
Copyright © 2017-2020 Invertase Limited. Except as otherwise noted, the content of this page is licensed under the Creative Commons Attribution 3.0 License, and code samples are licensed under the Apache 2.0 License. Some partial documentation, under the
rnfirebase.io
제일 먼저 공통으로 필요한 라이브러리를 설치해야 합니다.
yarn add @react-native-firebase/app

yarn add @react-native-firebase/analytics
2. Firebase SDK 등록
https://rnfirebase.io/#installation-for-react-native-cli-non-expo-projects
React Native Firebase | React Native Firebase
Welcome to React Native Firebase! To get started, you must first setup a Firebase project and install the "app" module. React Native Firebase has begun to deprecate the namespaced API (i.e firebase-js-sdk < v9 chaining API). React Native Firebase will be m
rnfirebase.io
react native에서 firebase 라이브러리를 사용하기 위해서 앱에 SDK를 등록해야 합니다.
https://console.firebase.google.com/
로그인 - Google 계정
이메일 또는 휴대전화
accounts.google.com
firebase console에 로그인한 후 기존 프로젝트가 있다면 선택하시고, 없다면 새로 추가해 주세요.

저는 기존에 push 알림을 구현할 때 사용했던 프로젝트를 재사용하겠습니다.

Project settings 선택

처음 프로젝트를 생성하면 좌측에 Android apps, Apple apps 등이 비어있을 것입니다. 우측에 Add app을 눌러 앱을 추가해 주세요.

AOS와 iOS 중 선택해 앱을 추가해 줍니다.
만약 두 플랫폼을 모두 하고 싶다면, 둘 다 추가해 주면 됩니다.


Android의 package name과 Apple bundle ID는 동일하게 작성합니다.
기존에 설정한 이름이 있다면 넣으시고 없다면 새로 작성하면 됩니다. react native 프로젝트를 처음 생성할 때(init) 정한 이름을 사용해도 되고, 변경해도 됩니다.
일반적으로 com.회사명.앱이름 으로 작성합니다.
이번 예제에선 com.yeonhub.analytics로 적용했습니다.


다음으로 넘어가면 firebase SDK config 파일을 받을 수 있습니다.
Android : google-services.json
iOS : GoogleService-Info.plist
두 파일 모두 frontend 루트 경로에 다운로드하여줍니다.

그 후 나머지 페이지들은 모두 Next를 눌러 넘어가줍니다.

Your apps에 생성한 app이 보인다면 정상적으로 등록된 것입니다.
3. Android
안드로이드의 경우 세 가지 작업을 추가로 해주어야 합니다.
1. google-services.json 위치 변경
2. package name 변경
3. gradle 네이티브 파일 수정
3-1) google-services.json 위치 변경
https://rnfirebase.io/#generating-android-credentials
React Native Firebase | React Native Firebase
Welcome to React Native Firebase! To get started, you must first setup a Firebase project and install the "app" module. React Native Firebase has begun to deprecate the namespaced API (i.e firebase-js-sdk < v9 chaining API). React Native Firebase will be m
rnfirebase.io
Download the google-services.json file and place it inside of your project at the following location: /android/app/google-services.json.
아까 다운로드한 google-services.json 파일을 android/app 경로로 옮겨주세요.

3-2) package name 변경
https://rnfirebase.io/#2-react-native-cli---android-setup
React Native Firebase | React Native Firebase
Welcome to React Native Firebase! To get started, you must first setup a Firebase project and install the "app" module. React Native Firebase has begun to deprecate the namespaced API (i.e firebase-js-sdk < v9 chaining API). React Native Firebase will be m
rnfirebase.io
On the Firebase console, add a new Android application and enter your projects details. The "Android package name" must match your local projects package name which can be found inside of the namespace field in /android/app/build.gradle, or in the manifest tag within the /android/app/src/main/AndroidManifest.xml
file within your project for projects using android gradle plugin v7 and below
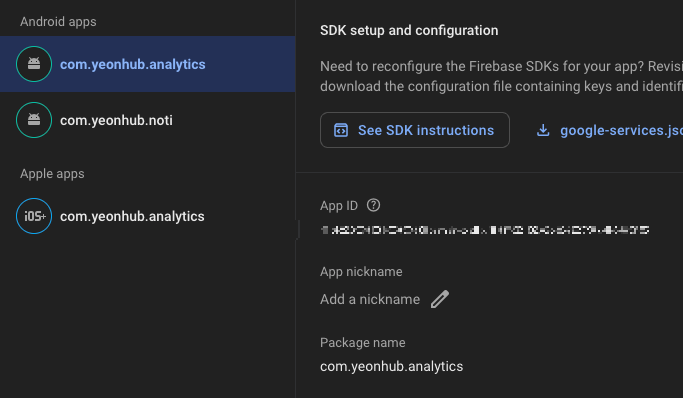
안드로이드 앱을 선택하면, 하단에 Package name이 있습니다.
이제 react native 앱의 안드로이드 package name과 일치하도록 총 3가지 파일을 수정해야 합니다.
1. android/app/build.gradle
2. android/app/src/main/java/com/앱이름/MainActivity.kt (혹은 java)
3. android/app/src/main/java/com/앱이름/MainApplication.kt (혹은 java)
// app gradle
android/app/build.gradle

...
android {
    ndkVersion rootProject.ext.ndkVersion
    buildToolsVersion rootProject.ext.buildToolsVersion
    compileSdk rootProject.ext.compileSdkVersion

			// 변경-1
    namespace "com.yeonhub.analytics"
    defaultConfig {
    				// 변경-2
        applicationId "com.yeonhub.analytics"
        minSdkVersion rootProject.ext.minSdkVersion
        targetSdkVersion rootProject.ext.targetSdkVersion
        versionCode 1
        versionName "1.0"
    }
...
// MainActivity
android/app/src/main/java/com/앱이름/MainActivity.kt (혹은 java)
// 변경-3
package com.yeonhub.analytics
...// MainApplicaion
android/app/src/main/java/com/앱이름/MainApplicaion.kt (혹은 java)
// 변경-4
package com.yeonhub.analytics
3-3) gradle 네이티브 파일 수정
https://rnfirebase.io/#configure-firebase-with-android-credentials
React Native Firebase | React Native Firebase
Welcome to React Native Firebase! To get started, you must first setup a Firebase project and install the "app" module. React Native Firebase has begun to deprecate the namespaced API (i.e firebase-js-sdk < v9 chaining API). React Native Firebase will be m
rnfirebase.io
To allow Firebase on Android to use the credentials, the google-services plugin must be enabled on the project. This requires modification to two files in the Android directory.
First, add the google-services plugin as a dependency inside of your /android/build.gradle file:
buildscript { dependencies { // ... other dependencies // NOTE: if you are on react-native 0.71 or below, you must not update // the google-services plugin past version 4.3.15 as it requires gradle >= 7.3.0 classpath 'com.google.gms:google-services:4.4.2' // Add me --- /\ } }
Lastly, execute the plugin by adding the following to your /android/app/build.gradle file:
apply plugin: 'com.android.application' apply plugin: 'com.google.gms.google-services' // <- Add this line
안드로이드를 빌드할 때 google-services.json 파일을 통해 google firebase를 앱에서 사용할 수 있도록 설정해 줍니다.
3-3-1) android/build.gradle
build.gradle 파일에 코드를 추가해 줍니다. 기존 gradle 작성 문법에 맞춰 추가하면 됩니다.
classpath('com.google.gms:google-services:4.4.2')

또는

classpath 'com.google.gms:google-services:4.4.2'
buildscript {
ext {
buildToolsVersion = "35.0.0"
minSdkVersion = 24
compileSdkVersion = 35
targetSdkVersion = 34
ndkVersion = "27.1.12297006"
kotlinVersion = "2.0.21"
}
repositories {
google()
mavenCentral()
}
dependencies {
classpath("com.android.tools.build:gradle")
classpath("com.facebook.react:react-native-gradle-plugin")
classpath("org.jetbrains.kotlin:kotlin-gradle-plugin")
classpath('com.google.gms:google-services:4.4.2')
}
}
apply plugin: "com.facebook.react.rootproject"
3-3-2) android/app/build.gradle
app 경로의 build.gradle에도 코드를 추가해줍니다.
apply plugin: 'com.google.gms.google-services'// 최상단
apply plugin: "com.android.application"
apply plugin: "org.jetbrains.kotlin.android"
apply plugin: "com.facebook.react"
apply plugin: 'com.google.gms.google-services'
...
4. iOS
https://rnfirebase.io/#generating-ios-credentials
React Native Firebase | React Native Firebase
Welcome to React Native Firebase! To get started, you must first setup a Firebase project and install the "app" module. React Native Firebase has begun to deprecate the namespaced API (i.e firebase-js-sdk < v9 chaining API). React Native Firebase will be m
rnfirebase.io
iOS도 마찬가지로 네이티브 작업을 총 3가지 해주어야 합니다.
1. GogoleService-Info.plist 등록
2. AppDelegate 수정
3. Podfile 수정
4-1) GogoleService-Info.plist 등록
Download the GoogleService-Info.plist file.
Using Xcode, open the projects /ios/{projectName}.xcodeproj file (or /ios/{projectName}.xcworkspace if using Pods).
Select the downloaded GoogleService-Info.plist file from your computer, and ensure the "Copy items if needed" checkbox is enabled.
CocoaPods를 사용 중이므로 xcode로 iOS 폴더의 .xcworkspace 폴더를 열어줍니다.

프로젝트명 우클릭 - Add Files to "프로젝트명"
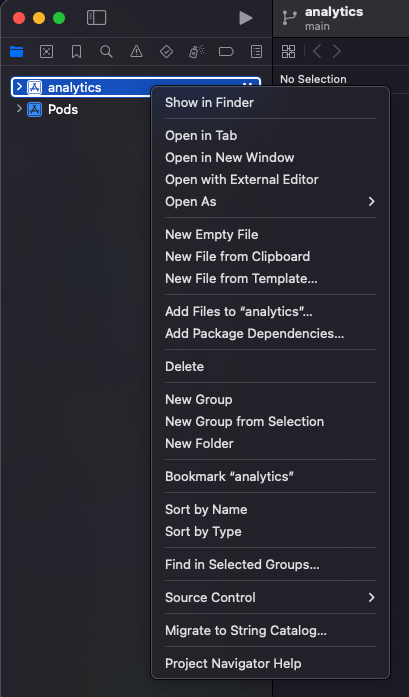
Firebase에서 다운로드한 config파일 GoogleService-Info.plist를 추가해 줍니다.
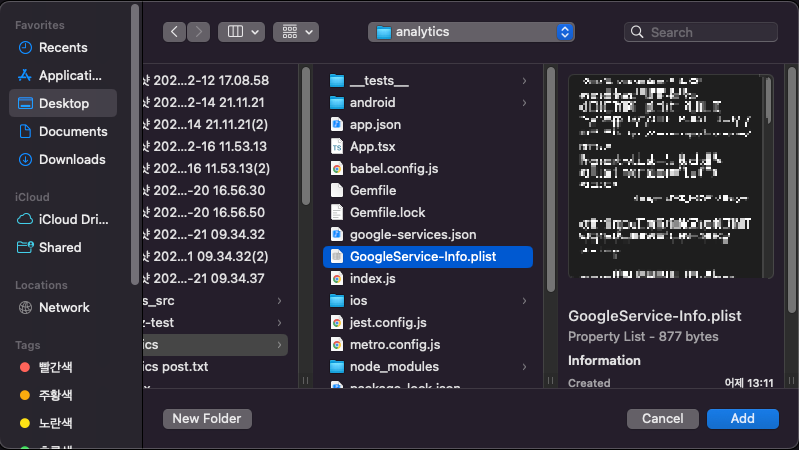
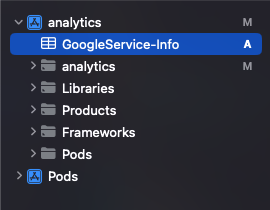
타겟을 체크하고, Copy로 복사해 줍니다.

이제 프로젝트 폴더에서 확인이 가능합니다.
4-2) AppDelegate 수정
https://rnfirebase.io/#configure-firebase-with-ios-credentials
React Native Firebase | React Native Firebase
Welcome to React Native Firebase! To get started, you must first setup a Firebase project and install the "app" module. React Native Firebase has begun to deprecate the namespaced API (i.e firebase-js-sdk < v9 chaining API). React Native Firebase will be m
rnfirebase.io
To allow Firebase on iOS to use the credentials, the Firebase iOS SDK must be configured during the bootstrap phase of your application.
To do this, open your /ios/{projectName}/AppDelegate.mm file (or AppDelegate.m if on older react-native), and add the following:
At the top of the file, import the Firebase SDK right after '#import "AppDelegate.h"':
#import <Firebase.h>
Within your existing didFinishLaunchingWithOptions method, add the following to the top of the method:
- (BOOL)application:(UIApplication *)application didFinishLaunchingWithOptions:(NSDictionary *)launchOptions { // Add me --- \/ [FIRApp configure]; // Add me --- /\ // ... }
iOS/프로젝트명/AppDelegate 파일을 수정해야 합니다.
React Native 0.71 이전 버전을 사용 중이라면 네이티브 파일이 Object-C++ 이기 때문에 AppDelegate.mm으로 되어있습니다.
0.72 이상 버전을 사용중이라면 아래 사진처럼 AppDelegate.swift 파일을 확인할 수 있습니다.

최상단에 0.71 이하 버전이라면, header 파일을 추가해 주고, 이후 버전이라면 FirebaseCore를 import 합니다.
// rn <= 0.71
#import <Firebase.h>

// rn >= 0.72
import FirebaseCore
그리고 firebase SDK 초기화를 위한 코드를 추가해 줍니다.
// rn <= 0.71
[FIRApp configure];

// rn >= 0.72
FirebaseApp.configure()
override 함수 application에 초기화 코드를 넣어주세요.
import UIKit
import React
import React_RCTAppDelegate
import ReactAppDependencyProvider
// Firebase import
import FirebaseCore

@main
class AppDelegate: RCTAppDelegate {
  override func application(_ application: UIApplication, didFinishLaunchingWithOptions launchOptions: [UIApplication.LaunchOptionsKey : Any]? = nil) -> Bool {

    // Firebase config 초기화
    FirebaseApp.configure()
    self.moduleName = "analytics"
    self.dependencyProvider = RCTAppDependencyProvider()
4-3) Podfile 수정
https://rnfirebase.io/#altering-cocoapods-to-use-frameworks
React Native Firebase | React Native Firebase
Welcome to React Native Firebase! To get started, you must first setup a Firebase project and install the "app" module. React Native Firebase has begun to deprecate the namespaced API (i.e firebase-js-sdk < v9 chaining API). React Native Firebase will be m
rnfirebase.io
Firebase iOS SDK 및 React Native Firebase에서 Firebase를 정적 프레임워크(Static Framework)로 빌드하도록 강제하는 작업을 해주어야 합니다.
use_frameworks! :linkage => :static을 추가하면 Swift 환경에서도 Firebase가 정상적으로 동작할 수 있도록 CocoaPods에서 정적 라이브러리로 링크되며, $RNFirebaseAsStaticFramework = true를 설정하면 React Native Firebase가 이를 인식하고 올바르게 빌드하도록 도와줍니다.
ios 폴더의 Podfile을 열어줍니다.

use_frameworks! :linkage => :static
$RNFirebaseAsStaticFramework = true
위 코드를 Podfile에 추가합니다.
# Resolve react_native_pods.rb with node to allow for hoisting
require Pod::Executable.execute_command('node', ['-p',
  'require.resolve(
    "react-native/scripts/react_native_pods.rb",
    {paths: [process.argv[1]]},
  )', __dir__]).strip

platform :ios, min_ios_version_supported
prepare_react_native_project!

linkage = ENV['USE_FRAMEWORKS']
if linkage != nil
  Pod::UI.puts "Configuring Pod with #{linkage}ally linked Frameworks".green
  use_frameworks! :linkage => linkage.to_sym
end

# firebase 의존성 추가
use_frameworks! :linkage => :static
$RNFirebaseAsStaticFramework = true
...
마지막으로 CocoaPods를 통해 의존성 라이브러리를 설치하고 적용하면 완성됩니다.
cd ios
pod install
install 도중 아래와 같은 로그가 출력된다면 정상적으로 등록된 것입니다.
RNFBApp: Using overridden static_framework value of 'true'
Downloading dependencies
Installing Firebase (11.8.0)
Installing FirebaseAnalytics (11.8.0)
Installing FirebaseCore (11.8.1)
Installing FirebaseCoreInternal (11.8.0)
Installing FirebaseInstallations (11.8.0)
...
4. frebase 초기화
이제 예제 코드를 통해 앱에서 firebase가 활성화되도록 초기화 함수를 추가해 보겠습니다.
⚠️ 본 예제 코드를 사용하려면 react-navigation/native, react-navigation/native-stack 라이브러리가 필요합니다.
필요 라이브러리와 의존성 라이브러리를 모두 설치해 주세요.
# React Navigation의 기본 패키지 설치
npm install @react-navigation/native
# Stack Navigator 패키지 설치
npm install @react-navigation/native-stack
# 의존성 라이브러리 설치
npm install react-native-screens react-native-safe-area-context
# iOS 환경이라면, Podfile 반영
cd ios && pod install
⚠️ 새 프로젝트로 본 예제를 따라 할 경우, RN 0.78 버전으로 설정됩니다.
현재 0.78 버전과 react-navigation의 의존성 라이브러리 react-native-screens의 버전이 호환되지 않아 iOS에서 빌드가 실패하는 이슈가 있습니다.
https://github.com/software-mansion/react-native-screens/issues/2594
// npx build
error Failed to build ios project. "xcodebuild" exited with error code '65'. To debug build logs further, consider building your app with Xcode.app, by opening 'analytics.xcworkspace'.
// xcode build
- No member named 'parentShadowView' in 'facebook::react::ShadowViewMutation'
따라서 0.77 버전으로 설치하는 것을 추천합니다.
npx @react-native-community/cli init 프로젝트명 --version 0.77.1
import React, {useEffect} from 'react';
import {NavigationContainer} from '@react-navigation/native';
import {createNativeStackNavigator} from '@react-navigation/native-stack';
import {getAnalytics, logEvent} from '@react-native-firebase/analytics';
import {getApp} from '@react-native-firebase/app';

import MainScreen from './screens/MainScreen';
import Depth1Screen from './screens/Depth1Screen';
import Depth2Screen from './screens/Depth2Screen';
import Depth3Screen from './screens/Depth3Screen';

const Stack = createNativeStackNavigator();

function App(): React.JSX.Element {

  // firebase analytics 인스턴스 생성
  const analytics = useMemo(() => getAnalytics(getApp()), []);

  // 앱 실행 시 app_open 이벤트 로깅
  useEffect(() => {
    logEvent(analytics, 'app_open');
  }, [analytics]);

  return (
    <NavigationContainer>
      <Stack.Navigator
        screenOptions={{
          headerLeft: () => null,
          headerBackVisible: true,
        }}>
        <Stack.Screen name="Main" component={MainScreen} />
        <Stack.Screen name="Depth1" component={Depth1Screen} />
        <Stack.Screen name="Depth2" component={Depth2Screen} />
        <Stack.Screen name="Depth3" component={Depth3Screen} />
      </Stack.Navigator>
    </NavigationContainer>
  );
}

export default App;
screen들은 screens 폴더에 있습니다.
// MainScreen.tsx

import React from 'react';
import {View, Button, StyleSheet} from 'react-native';
import {NativeStackNavigationProp} from '@react-navigation/native-stack';

type Props = {
  navigation: NativeStackNavigationProp<any>;
};

const MainScreen = ({navigation}: Props) => {
  return (
    <View style={styles.container}>
      <Button title="Depth 1" onPress={() => navigation.navigate('Depth1')} />
    </View>
  );
};

const styles = StyleSheet.create({
  container: {
    flex: 1,
    justifyContent: 'center',
    alignItems: 'center',
  },
});

export default MainScreen;
// Depth1Screen.tsx
import React from 'react';
import {View, Button, StyleSheet} from 'react-native';
import {NativeStackNavigationProp} from '@react-navigation/native-stack';
type Props = {
navigation: NativeStackNavigationProp<any>;
};
const Depth1Screen = ({navigation}: Props) => {
return (
<View style={styles.container}>
<Button title="Depth 2" onPress={() => navigation.navigate('Depth2')} />
</View>
);
};
const styles = StyleSheet.create({
container: {
flex: 1,
justifyContent: 'center',
alignItems: 'center',
},
});
export default Depth1Screen;// Depth2Screen.tsx
import React from 'react';
import {View, Button, StyleSheet} from 'react-native';
import {NativeStackNavigationProp} from '@react-navigation/native-stack';
type Props = {
navigation: NativeStackNavigationProp<any>;
};
const Depth2Screen = ({navigation}: Props) => {
return (
<View style={styles.container}>
<Button title="Depth 3" onPress={() => navigation.navigate('Depth3')} />
</View>
);
};
const styles = StyleSheet.create({
container: {
flex: 1,
justifyContent: 'center',
alignItems: 'center',
},
});
export default Depth2Screen;// Depth3Screen.tsx
import React from 'react';
import {View, Text, StyleSheet} from 'react-native';
const Depth3Screen = () => {
return (
<View style={styles.container}>
<Text>Depth 3</Text>
</View>
);
};
const styles = StyleSheet.create({
container: {
flex: 1,
justifyContent: 'center',
alignItems: 'center',
},
});
export default Depth3Screen;
5. screen 이동 이벤트 핸들러
screenListeners를 통해 stack navigation이 포커싱 될 때 screen 이름을 로그로 보는 코드를 추가하면 확인이 가능합니다.
      <Stack.Navigator
        screenOptions={{
          headerLeft: () => null,
          headerBackVisible: true,
        }}
        screenListeners={{
          focus: e => {
            const screenName = e?.target?.split('-')[0];
            console.log(screenName);
          },
        }}>


// console.log
Main		App.tsx:39
Depth1		App.tsx:39
Depth2		App.tsx:39
Depth3		App.tsx:39
이제 firebase analytics에 전송하기 위해 firebase의 logEvent를 추가합니다.
      <Stack.Navigator
        screenOptions={{
          headerLeft: () => null,
          headerBackVisible: true,
        }}
        // 화면 전환 시 screen_name 이벤트 로깅
        screenListeners={{
          focus: async e => {
            const screenName = e?.target?.split('-')[0];
            console.log(screenName);
            await logEvent(analytics, 'screen_name', {
              screen_name: screenName,
              screen_class: screenName,
            });
          },
        }}>
이렇게 되면 앱 사용자가 screen을 이동할 때 로그를 남기게 됩니다.
6. firebase analytice console 모니터링
analytics에서 확인하기까지 약 하루정도 소요됩니다. 따라서 방금 코드를 추가해 분석 데이터를 전송했다면, 내일 확인이 가능합니다.
https://analytics.google.com/analytics/web/
Redirecting...
analytics.google.com
analytics console 대시보드에서 여러 항목들을 확인할 수 있습니다.

아까 설정했던 sceen에 대한 정보를 확인하려면, 보고서 - 수명 주기 - 참여도 - 페이지 및 화면에서 확인 가능합니다.


페이지 및 화면 - 페이지 제목 및 화면 클래스를 페이지 제목 및 화면 이름으로 변경합니다.

기본으로 제공하는 이벤트들 외에도 커스텀하여 본인이 원하는 정보들을 수집할 수 있습니다.
사용자 행동 추적을 위한 버튼 클릭 로깅, 상품 클릭 시 로깅 등 원하는 대로 이벤트의 이름과 파마미터를 커스텀하여 활용해 보시기 바랍니다.
본 포스팅 예제 코드는 아래 리포지토리에 업로드하였습니다.
https://github.com/yeonhub/yeonhub-post/tree/analytics-cli
GitHub - yeonhub/yeonhub-post: 티스토리 포스팅 예제 리포지토리 / https://nonmajor-be-developer.tistory.com
티스토리 포스팅 예제 리포지토리 / https://nonmajor-be-developer.tistory.com - yeonhub/yeonhub-post
github.com