
Firebase Analytics는 사용자들이 앱을 어떻게 사용하는지, 어떤 기능이 인기 있는지, 앱 사용 중 어떤 행동들이 자주 일어나는지 등을 알 수 있게 해주는 도구입니다. 이 데이터를 기반으로 앱을 개선할 수 있고, 사용자 경험을 더 좋게 만들 수 있습니다.
앱을 운영하면서 "사용자가 내 앱을 어떻게 사용할까?"라는 궁금증이 들 때, Firebase Analytics가 큰 도움이 됩니다. 예를 들어, "어떤 화면을 오래 보고, 어떤 버튼을 자주 클릭하는지" 등을 알 수 있습니다. 그래서 이 데이터를 통해 앱을 더 효과적으로 개선할 수 있게 됩니다.
1. Friebase/app, Firebase/analytics 설치
https://rnfirebase.io/#install-react-native-firebase-modules
React Native Firebase | React Native Firebase
Welcome to React Native Firebase! To get started, you must first setup a Firebase project and install the "app" module. React Native Firebase has begun to deprecate the namespaced API (i.e firebase-js-sdk < v9 chaining API). React Native Firebase will be m
rnfirebase.io
firebase와 firebase-analytics 사용을 위한 라이브러리를 설치합니다.
// firebase
npx expo install @react-native-firebase/app

// firebase analytics
npx expo install @react-native-firebase/analytics
2. Firebase SDK 등록
앱에서 Firebase를 사용하기 위해선 Firebase에 프로젝트를 등록하고 해당 프로젝트와 앱을 연결하기 위한 작업이 필요합니다.
https://nonmajor-be-developer.tistory.com/entry/React-Native-Firebase-Analytics-%EC%B6%94%EA%B0%80-%ED%95%98%EA%B8%B0
React Native Firebase Analytics 추가 하기
Firebase Analytics는 사용자들이 앱을 어떻게 사용하는지, 어떤 기능이 인기 있는지, 앱 사용 중 어떤 행동들이 자주 일어나는지 등을 알 수 있게 해주는 도구입니다. 이 데이터를 기반으로 앱을 개
nonmajor-be-developer.tistory.com
React Native CLI 포스트에서 '2. Firebase SDK 등록'을 진행해 주세요.
AOS : google-services.json
iOS : GoogleService-Info.plist
플랫폼에 맞게 파일을 루트 경로에 넣어줍니다.
3. Android
https://rnfirebase.io/#configure-react-native-firebase-modules
React Native Firebase | React Native Firebase
Welcome to React Native Firebase! To get started, you must first setup a Firebase project and install the "app" module. React Native Firebase has begun to deprecate the namespaced API (i.e firebase-js-sdk < v9 chaining API). React Native Firebase will be m
rnfirebase.io

앱에서 구성 파일(google-services.josn)을 읽을 수 있도록 등록합니다.
1. "googleServicesFile"
2. "package"
3. "plugins"
{
  "expo": {
   .
    "android": {
    .
    // google-services.jons 경로 지정
      "googleServicesFile": "./google-services.json",
      // package명 수정
      "package": "com.yeonhub.analytics"
    },
	.
    "plugins": [
	.
    // firebase plugin 추가
      "@react-native-firebase/app",
      .
4. iOS
iOS의 경우 라이브러리를 하나 더 추가해주어야 합니다.
npx expo install expo-build-properties

cd ios && pod install
https://docs.expo.dev/versions/latest/sdk/build-properties/
BuildProperties
A config plugin that allows customizing native build properties during prebuild.
docs.expo.dev
iOS는 라이브러리를 프로젝트에 추가할 때 두 가지 방식이 있습니다.
동적 프레임워크인 use_frameworks(dynamic frameworks) 앱이 실행될 때 로드되는 방식과 빌드 과정에서 컴파일할 때 로드되는 useFrameworks:"static"(static frameworks) 방식이 있는데, Firebase SDK는 use_frameworks!(dynamic frameworks)를 지원하지 않기 때문에 static frameworks 방식(빠른 로드 필수)을 사용해야 합니다.
https://rnfirebase.io/#configure-react-native-firebase-modules
React Native Firebase | React Native Firebase
Welcome to React Native Firebase! To get started, you must first setup a Firebase project and install the "app" module. React Native Firebase has begun to deprecate the namespaced API (i.e firebase-js-sdk < v9 chaining API). React Native Firebase will be m
rnfirebase.io
앱에서 구성 파일(google-services.josn)을 읽을 수 있도록 등록합니다.
1. "googleServicesFile"
2. "bundleIdentifier"
3. "plugins"
4. "expo-build-properties"
{
  "expo": {
  .
    "ios": {
  	.
    // GoogleService_Info.plist 경로
      "googleServicesFile": "./GoogleService-Info.plist",
      // app 번들 이름
      "bundleIdentifier": "com.yeonhub.analytics"
    },
    .
    "plugins": [
     .
     // Firebase
     "@react-native-firebase/app",
     // static frameworks
      [
        "expo-build-properties",
        {
          "ios": {
            "useFrameworks": "static"
          }
        }
      ]
5. firebase 초기화
이제 예제 코드를 통해 앱에서 firebase가 활성화되도록 초기화 함수를 추가해 보겠습니다.
https://rnfirebase.io/analytics/usage#disable-auto-initialization
Analytics | React Native Firebase
Copyright © 2017-2020 Invertase Limited. Except as otherwise noted, the content of this page is licensed under the Creative Commons Attribution 3.0 License, and code samples are licensed under the Apache 2.0 License. Some partial documentation, under the
rnfirebase.io


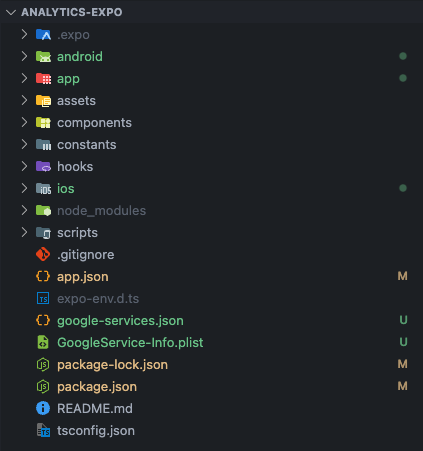
예제 코드의 폴더 구조는 위와 같습니다.
// _layout.tsx

import { Stack } from "expo-router/stack";
import analytics from "@react-native-firebase/analytics";
import { useEffect } from "react";

export type RootStackParamList = {
  "(stack)/Depth1Screen": undefined;
  "(stack)/Depth2Screen": undefined;
  "(stack)/Depth3Screen": undefined;
};

export default function RootLayout() {

// 앱 실행 시 한 번만 실행
  useEffect(() => {
    async function initializeApp() {
      try {
        await analytics().setAnalyticsCollectionEnabled(true);
        console.log("firebase 초기화 성공");
      } catch (error) {
        console.error("firebase 초기화 실패:", error);
      }
    }
    initializeApp();
  }, []);

  return (
    <Stack>
      <Stack.Screen name="(stack)/Depth1Screen" />
      <Stack.Screen name="(stack)/Depth2Screen" />
      <Stack.Screen name="(stack)/Depth3Screen" />
    </Stack>
  );
}
6. screen 이동 이벤트 핸들러
https://rnfirebase.io/analytics/screen-tracking
Screen Tracking | React Native Firebase
Copyright © 2017-2020 Invertase Limited. Except as otherwise noted, the content of this page is licensed under the Creative Commons Attribution 3.0 License, and code samples are licensed under the Apache 2.0 License. Some partial documentation, under the
rnfirebase.io
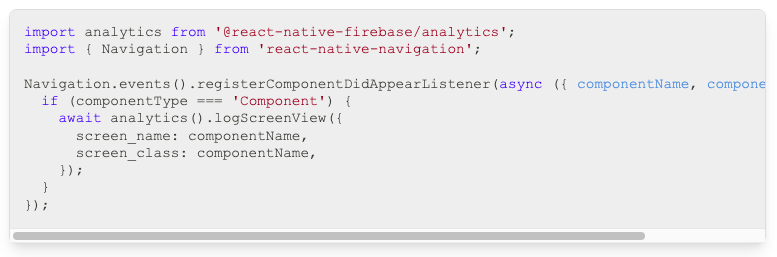
analytics의 logScreenView를 이용해 스크린 리스너에 호출되도록 추가해 줍니다.
import { Stack } from "expo-router/stack";
import analytics from "@react-native-firebase/analytics";
import { useEffect } from "react";

export type RootStackParamList = {
  "(stack)/Depth1Screen": undefined;
  "(stack)/Depth2Screen": undefined;
  "(stack)/Depth3Screen": undefined;
};

export default function RootLayout() {

// 방문한 스크린 기록 함수
  const logScreenView = async (screenName: string) => {
    try {

    // analytics의 logScreenView 메서드
      await analytics().logScreenView({
        screen_name: screenName,
        screen_class: screenName,
      });
      console.log("스크린 로깅 성공:", screenName);
    } catch (error) {
      console.error("스크린 로깅 실패:", error);
    }
  };

  useEffect(() => {
    async function initializeApp() {
      try {
        await analytics().setAnalyticsCollectionEnabled(true);
        console.log("firebase 초기화 성공");
      } catch (error) {
        console.error("firebase 초기화 실패:", error);
      }
    }
    initializeApp();
  }, []);

  return (
    <Stack
      screenListeners={{
        state: (e) => {
          const route = e.data?.state?.routes?.slice(-1)[0];
          if (route) {
            logScreenView(route.name);
          }
        },
      }}
    >
      <Stack.Screen name="(stack)/Depth1Screen" />
      <Stack.Screen name="(stack)/Depth2Screen" />
      <Stack.Screen name="(stack)/Depth3Screen" />
    </Stack>
  );
}
7. expo prebuild
Firebase Analytics는 네이티브 빌드가 필요하기 때문에 Expo Go에서 실행 불가능합니다.
npx expo prebuildprebuild 성공이 되었다면 루트 경로에 ios, android 폴더가 생성됩니다.
이후 run 명령어를 통해 앱을 빌드할 수 있습니다.
npx expo run8. firebase analytice console 모니터링
analytics에서 확인하기까지 약 하루정도 소요됩니다. 따라서 방금 코드를 추가해 분석 데이터를 전송했다면, 내일 확인이 가능합니다.
https://analytics.google.com/analytics/web
Redirecting...
analytics.google.com
analytics console 대시보드에서 여러 항목들을 확인할 수 있습니다.

아까 설정했던 sceen에 대한 정보를 확인하려면, 보고서 - 수명 주기 - 참여도 - 페이지 및 화면에서 확인 가능합니다.


페이지 및 화면 - 페이지 제목 및 화면 클래스를 페이지 제목 및 화면 이름으로 변경합니다.

기본으로 제공하는 이벤트들 외에도 커스텀하여 본인이 원하는 정보들을 수집할 수 있습니다.
사용자 행동 추적을 위한 버튼 클릭 로깅, 상품 클릭 시 로깅 등 원하는 대로 이벤트의 이름과 파마미터를 커스텀하여 활용해 보시기 바랍니다.
본 포스팅 예제 코드는 아래 리포지토리에 업로드하였습니다.
⚠️ 아래 두 파일을 반드시 본인 프로젝트의 파일로 변경해주세요.
AOS : google-services.json
iOS : GoogleService-Info.plist
https://github.com/yeonhub/yeonhub-post/tree/analytics-expo
GitHub - yeonhub/yeonhub-post: 티스토리 포스팅 예제 리포지토리 / https://nonmajor-be-developer.tistory.com
티스토리 포스팅 예제 리포지토리 / https://nonmajor-be-developer.tistory.com - yeonhub/yeonhub-post
github.com